Saturday, September 15, 2012

Kadi-Pakora with Spinach


 Clearly there are two parts to this dish. And by themselves, each can be a stand alone dish. The pakora and the Kadi -Pakoras are fried/baked fritters usually made with besan/chickpea flour and veggies like onions and chilies. They can also be made with spinach as this recipe explains. The second part of this recipe is the Kadi, which is also called Mor Kozhambu in the south with a few differences. Kadi is essentially a yogurt based sauce to which you add some chickpea flour, herbs and condiments for spicing it up. I present to you both recipes, both extremely simple and I hope the pictures I present make you salivate enough to want to make this right away :)
This can be had by itself as a HOT snack :)
Ingredients

For the Pakoras

  • 1lb of frozen fresh spinach
  • 2tbsp chickpea flour
  • 2 spicy green chilies
  • 1tsp caraway seeds
  • salt
  • grated ginger (optional)
  • oil to fry


For the Kadi

  • 2cups of plain yogurt
  • 1tbsp channa dal (or chickpeas)
  • 2 fresh (and spicy green chilies)
  • 1tsp whole black pepper
  • 1tsp cumin
  • A pinch of asafetida
  • Cilantro - 2tbsp chopped (optional) I use it liberally because i LOVE the smell of it
  • Salt


For Garnish

  • 1/2 tsp caraway seeds
  • 1tsp coconut oil
  • 1tsp mustard seeds (small ones preferably)
  • 1sprig of curry leaves


Method

Preparing the Pakoras

  1. Cook spinach with small quantity of water if fresh or thaw out if frozen
  2. Drain the water
  3. Add salt, green chilies, caraway seeds and besan and mix until it is of thick and "ball-able" consistency. Add the ginger in along with the rest of the ingredients if you are using it.
  4. Make the balls and keep


Prepare your Kadi

  1. While your spinach is cooking, soak all ingredients except for the yogurt and salt in about 1/2 cup of warm to hot water for about 15 -30 minutes
  2. Grind finely in mixera
  3. Add salt
  4. Place on stove in a pan and cook until it thickens.
  5. Allow it to cool for a few minutes
  6. Whip the yogurt into a smooth thick paste
  7. Add to the pan and mix in well.
  8. Add the garnish
  9. Now heat the oil in a frying pan and fry the pakoras
  10. Drop them hot into the kadi and serve immediately


Note: if you are not serving right away, hold off on making the pakoras until you are ready to eat.
If your spinach remains soggy, you could add more besan or powdered cashews (about 5 -10 nuts)
Enjoy this classic north Indian dish with freshly cooked white fluffy and incredibly aromatic basmati rice :)


Thursday, September 13, 2012

Fabulous Focaccia my ‘Whey’

Oven ready

Today it is my pleasure to WOW you with my protein rich, colorful focaccia. Pronounced Fo-Ka-Cha
Pari of Fooddelicious had this ever so tempting post on her blog last week and I knew I simply HAD to make it – I had all the fresh home grown ingredients for it and I said, hey, let’s do it and I did. It turned out to be a phenomenal success (which is measured in how many minutes it takes to get devoured by my kids) and truth to tell, I am happy I got a minute to take the pictures before my kids went gung-ho with it.I had some when sitting around in the fridge left over from making some paneer. I used it in a couple of ways: one in the soup I made to accompany the focaccia and two, in the focaccia itself. While the taste did not change any, it felt better that with the carbs, there was also some protein. If you are a vegetarian, you know how difficult it is to avoid carbs – even if you are seeking the complex kinds. Anyway, without further natter, I present to you my fresh, really fresh, Focaccia
Baked to a nicety!

Ingredients

For the dough
  • 3-4 cups of bread flour ( I used King Arthur’s unbleached bread flour)
  • 1tbsp of instant yeast
  • 2tbsp crushed fresh rosemary
  • 1tsp salt
  • 1tsp sugar
  • 4cloves of freshly squeezed garlic
  • 2tbsp of olive oil
  • 1cup of warm whey (I subbed whey for the water which is the original way to go - Curd or milk would also be a good idea should you want to try)
  • 2tbsp warm water
  • Some more warm water as need to get the right consistency

Home grown tomatoes, onions and Rosemary

For the Garnish
  • 1 cup of cherry tomatoes (any kind)
  • 2 sprigs of Rosemary
  • 1-2tbsp of olive oil
  • 3small onions diced
  • 2tbsp fresh garlic chives, chopped
Method
  1. In 2tbsp of warm water, add the sugar & yeast and allow it to froth
  2. In the meantime, combine flour and salt and all the chopped herbs and spices and mix dry
  3. Add the olive oil and mix
  4. Add the frothing yeast to the flour and mix in well
  5. Now add the warm whey and knead either in your mixer or by hand
  6. Knead until it is a smooth ball that lifts off without sticking to the sides of the bowl
  7. Put a plastic cover (I often use grocery bags) and let it sit for a couple of hours
  8. About 15 minutes before the dough time is up, chop your onions and chives
  9. Get your pan ready and sprayed and set the oven to 350 deg. F
  10. Take dough out and punch down to release the air.
  11. Roll or knead it out to the shape of the pan (I used a rectangular one)
  12. With the knuckle of you index finger, make dots or dips in the spread dough
  13. Brush with olive oil
  14. Arrange your tomatoes appealingly (:
  15. And you onions and chives
  16. Allow this to sit for about 20 minutes (keep covered if need be) This will help the dough to rise a bit more)
  17. Bake for 25-30 minutes, until you see that the crust is brown and the top is starting to brown lightly too.
  18. Remove, cut and eat…

Optional: grate some fresh Parmesan Cheese


A side view of the yummy crust

Hope you enjoy the visuals and please try to make this at home and show off to you family your gourmet chef qualities :) Adios amigos until next time


Wednesday, September 12, 2012

Figs & Coconut Halwa


Ganesha's grace abounds. My site is back up and running with a new look, thanks to Elizabeth Hillstrom, a bright young student who has made this happen for me. It is a simple and easy to navigate layout and I love the look of it :) - I am also operating from priyasnowserving.net, should you prefer a WP format - And if you like the work of this young girl, and the recipes you see showcased, don't hesitate to like us on Facebook :)
Ganesha is remembered every single day in my house, in the most delightful way for me – In that I get to be him every day, sometimes once often twice a day – My soon to be 4 yr old loves the Ganesha stories she has heard and watched from Karadi Tales. She is always Parvati and I get to be Ganesha, who guards zealously her gates as she takes the most leisurely bath in the world, using up all the water of the ganges J - And Hubby dear gets to be Shiva who confronts Ganesha before lopping off his head – the whole scene is enacted each day with no variations allowed, unless the variation has the little one bursting into giggles. My Shiva does a stellar job of showing rage – his whole face vibrating, jaws jiggling (lol) Lots of fun, but I think we are ready to move on to a new act. But not before we celebrate the joyous day when we offer our salutations to our potbellied, elephant faced, single tusked lord of wisdom who removes obstacles – In fact it is the remorse of Shiva for having lopped Ganesha’s head off that makes him bestow upon his son the boon that he would be revered first before Shiva himself. Ganesha loves food, especially sweet dumplings aka Kozhakattais/modhakams or so the story goes. Gourmets like us love to make this an excuse to prepare modakams rice flour shells stuffed often with jaggery and coconut, or jaggery and lentils.
For this occasion, I chose to add a slight twist to the tradition, while still upholding it, by adding freshly picked figs.  This enhanced if anything the already delicious dish by giving it a fantastic flavor. It turned out like a most delectable halwa that could be devoured just like that – Which is why I called it a Halwa. Halwa is best defined as a sweet sticky dessert often made with flour and nuts and fruits. This dish has the nut and the fruit.

I am happy to that a post of offering to Ganesha is my first one for the Avant Garde Cookies group that I am now a part of.


Here is my offering to Ganesha recipe and all.

Ingredients

For the Stuffing

  • 16 Ripe or almost ripe Figs
  • 1 cup of grated Coconut
  • 1 cup of jaggery
  • 1 tsp of powdered cardamom
  • 2 tsp of water

For the dumpling shell
  • 2 cups of rice flour
  • 1 cup of water
  • A pinch of salt
  • 1tsp of sesame oil
Jaggery
Cardamom


Fresh Grated Coconut

Fresh Picked Figs
Method

Stuffing
  1. Powder your jaggery – they usually come in blocks and can be found at the Indian store
  2. In a saucepan, add 2 tsp of water and the jaggery
  3. Let it become syrupy
  4. Add the powdered cardamom
  5. Follow it with the coconut and let it cook in the jaggery until the water from the jaggery is completely gone and the mix is thick and stuffable
  6. Remove from flame and allow it to cool

Shell
  1. In the meantime, sift the rice flour
  2. Roast it for literally a minute in a wide pan
  3. Now add the water and salt and what I do is spin it once in the blender so that it is a pasty fluid
  4. Pour this liquid into a saucepan and stir away until the rice flour cooks
  5. Stirring helps avoid knots in the dough
  6. When the white fluid thickens and comes off the sides, add the oil
  7. The color will not be white anymore and the dough will have assumed a cooked look.
  8. Switch off and cover with a cloth so that it does not dry out.


Both these processes take no more than 10 -15 minutes flat – I kid you not.


  1. Now Let’s get them together
  2. So make lemon sized or even smaller balls with the dough. Put your thumbs in the middle of the ball and start pressing the sides, creating a dippy hole in the middle.
  3. Make sure this is deep and the sides are thin without falling apart.
  4. Now take a teaspoon of the stuffing and place in the hole.
  5. Gently fold the sides pulling up with your fingers to make a small tuft, so to speak.
  6. The other method is the make a smile –
  7. Make a round flat circle with the dough.
  8. Add the stuffing and fold joining at the corners, pressing them together. Both kinds are shown below.
  9. Steam them and you have your Kozhakattais 

Offer to the Good Lord Ganesha before you pop one into your mouth J Happy Chaturthi Folks and May Lord Ganesha obliterate any obstacles in your life.


My first Avant Garde Cookies Post 

Linking this to Cook Like a Chef

Saturday, September 8, 2012

Roasted Garlic & Cherry Tomatoes


Roasted Garlic & Cherry Tomatoes


They are small, beautiful, and perfectly round. They are sun kissed, thin-skinned and utterly juicy. They can be eaten like grapes and are a perfect addition to a green salad. So those were pretty much the two ways in which we were eating these beautiful tomatoes, a bumper crop in my friend’s veggie garden. She and I have bartered veggies from each other’s gardens, although hers is twice as big as mine – I got figs, sun-gold tomatoes, delicious cucumbers, basil and now spicy chilies (yes!) and I gave her some of my okra eggplant and earlier on some cilantro, lettuce.
The last time she gave me some of these, I had them unused in my fridge and she suggested this preparation to me. Thanks Fla! It was amazing!
Now this is a post for a special blogger friend, Radhika who is celebrating her birthday today. She has been appreciating recipes from my garden all through the summer and I thought it would be befitting to post something fresh for her.
I also take this opportunity to announce that I am joining Radhika and the stellar bunch of bloggers on their Avant Garde Cookies, Epicurean Voyage. I am thrilled and excited to be doing this with Radhika, a versatile and energetic woman who constantly organizes wonderful new ways of enhancing our culinary creativity and her own. Priya Sreeram, whom I’ve considered a soul sister from the get-go who writes from her heart and cooks that way too. Kavitha, a young lady who has impressed me as an enterprising “cookie” juggling a blog where she is so active and university, hats off to her! I am looking forward to getting to know my other cookies over the course of this voyage; Jay, Veena, Roshni & Anusha  – First impressions however…
When I visited Anusha’s Blog, the picture of her Vegetable Fried Rice bowled me over – I would have liked that bowl all to myself!
The Tamarind Ginger Pickle that I saw when I visited Roshni’s blog had my tongue in a tickle for a lick of that delish pickle
The Eggless Double chocolate cookies on Veena’s blog seem like the perfect post dinner munch for me as I write this
Jayanthy’s blog is a visual treat with amazing pictures…
My voyage with the group begins soon…
Back to the recipe with homegrown deliciousness – but for the garlic all else was grown in my garden – The tomatoes are of course courtesy my pal.
Ingredients
  • 1 lbs of Sun Gold Tomatoes washed
  • A Handful of  Red & Purple Cherry Tomatoes
  • 3 small-medium red onions
  • 2 pods of garlic
  • Spices
  • Rosemary & Oregano
  • Ground Pepper
  • Sea Salt
  • Olive Oil Spray
Angel Hair pasta (as much as needed)
Method
  1. Set the Oven at 350 degrees F
  2. Spray a baking pan with olive oil
  3. Layer with tomatoes
  4. Place garlic pods in the pan
  5. Chop the onions and find room for them as well on the pan
  6. Add fresh oregano & rosemary
  7. Bake for 45 minutes
  8. In the mean time, boil your pasta, drain over cold water.
  9. Drizzle a small quantity of olive oil along with some salt and toss
  10. Remove veggies from oven and serve over the pasta.
  11. Eat with gusto.

This is a perfect post for my blog event FAST FOOD not FAT FOOD guest-hosted this time by my sweet friend, Archana of The Mad Scientist's Kitchen - Do send you entries to her if you have a healthy recipe you've made - 


Other ladies wishing Radhika a happy birthday with a virtual treat are Priya, Roshni, Kavi
A couple of links to visit
Priya: http://eq-myblog.blogspot.in/2012/09/chilled-nutty-choco-bites-virtual.html
Roshni: http://arusuvai-kurippu.blogspot.co.uk/2012/09/baingan-bharta.html
Kavitha:http://foodomania.com/quick-birthday-chocolate-cake/comment-page-1/#comment-1431

Saturday, September 1, 2012

Gongura Chutney/ Sorrel Chutney/Spread


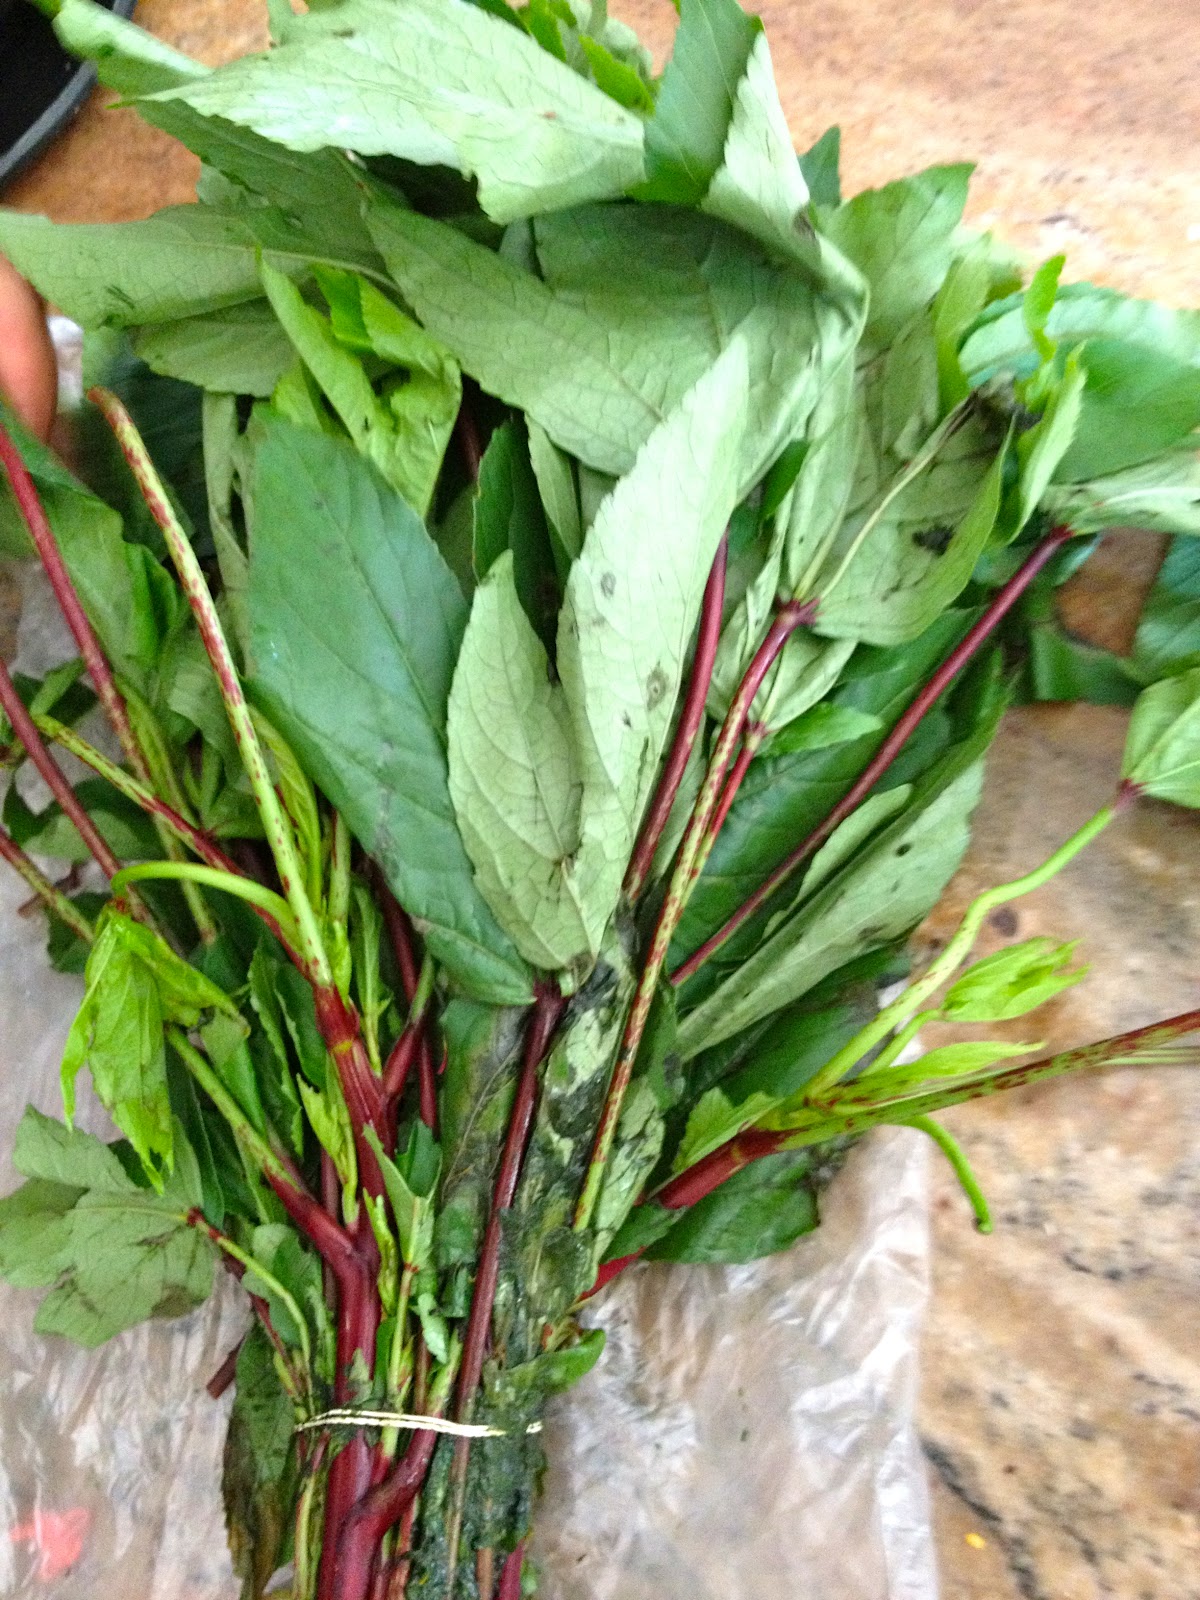
I have been saying it with Chutney's and spreads this summer from figs and goji berries to cherries and pesto. I now present Gongura chutney, a native dish of Andhra Pradhesh, well loved by Indians from all other parts of the country too :) For those who are not familiar with these beautiful greens, they have large crinkly leaves with a burgundy red stem and veins.  I had no idea what their English name was and got to it after several google searches. These greens have an innate sourness to them, something I was NOT aware of until after I added some tamarind, like we normally do for green leafy chutneys. I will not add tamarind to the recipe I have noted down for you. They are deliciously flavorful and serve as a great addition to the table in more ways than one - As a side to be had with yogurt rice, in the true south Indian style; to mix in with hot basmati rice and devoured; as a spread over a french baguette or with Indian lentil crepes, aka, Dosas, just to name a few.


Here is the recipe for this deadly delicious chutney

Ingredients


  • 1 bunch (about a pound) as sold in the Indian store
  • 1/4 cup of urad dal (black gram - ulundhu)
  • 1 tsp mustard seeds
  • 3 tbsp Sesame Oil
  • 2 Tbsp bengal gram (channa dal - Kadalai paruppu)
  • 6 really spicy dry red chilies (I got mine from the mexican store)
  • 1 lemon sized ball of jaggery (powdered)
  • 1/4 tsp asafetida
  • salt to taste


Method

  1. Wash the leaves several times to get rid of all the dirt off it and shake off the water
  2. In a wide (preferably non-stick pan) add the sesame oil and heat. 
  3. Add and pop the mustard seeds. 
  4. Add the chilies and allow them to roast for a minute without getting burnt
  5. Add the asafetida urad dal and the channa dal and roast until brown
  6. Add the leaves and turn it until they become a deep green bordering on brown. 
  7. Now add the powdered jaggery and the salt. 
  8. Turn for a minute until the jaggery melts.
  9. Grind in a food processor until the leaves are ground to a gritty paste.
  10. The Dals may not grind completely and may be semi-broken, but this is just fine because it add to the texture of the chutney. 
  11. DO NOT use any water to grind- the water from the leaves will suffice - 
  12. I used an additional 2 tsp of sesame oil and gave the processor one last turn before transferring to a bowl.


Enjoy in any way you want. And hope you'll like it as much as we did! It goes all too fast!


FAST FOOD NOT FAT FOOD # 8

Happy to announce that after one skipped session, FFNFF is back on track and is being guest hosted by my pal Arhcana, of The Mad Scientist's Kitchen - Please read the rules and do send you entries to the event