Showing posts with label Spreads. Show all posts

Friday, January 4, 2013

Rosy Raita with Beets


My first post for the NEW YEAR was to be my peanut soup - but as I've lamented on my facebook page, both the times I made it were for parties not hosted by me and it got eaten up well before I could remember to take my clicks - But by golly, I will make it again anon and will present it with the aplomb it deserves. But for now let me feast your eyes and senses to this mind blowing raita.

When I first tasted this in Delhi at my sister's house, I was blown away by the color of it - So beautiful and the taste was no less incredible - That very moment, I had resolved to make this once I got back home. While it has taken me months to get to it, I finally did it and it was, as I'd predicted, a huge hit with friends and family alike.  This is a killer dish to brighten any dinner table, its rich color at once brightening the table and the eyes of those that lay sight on it.

What you need:

  1. 1 big beet grated very finely or pureed
  2. 1 carton (32 oz) of yogurt - I used Dannon PlainYogurt
  3. For garnish
  4. 1/2 tsp of fennel seeds
  5. 1/2 tsp of cumin seeds
  6. 1 spicy green chili finely chopped
  7. 1tsp mustard seeds 
  8. 1tsp of oil to pop and sautee the above
  9. Salt

Method

  • Peel and puree (or) finely grate the beet - I chose to do the latter
  • Pour the yogurt into a serving dish and whip it to make it smooth
  • Add the beets and whisk it it
  • Watch the magic of the beautiful rose color engulf the bowl :)
  • Saute the seeds and chili and mix it into the raita
  • Refrigerate until time to serve
  • *Garnish with cilantro if desired.
  • Serve with aromatic pulao like I did 


Enjoy and will be back soon with another yummy recipe - yup- the peanut soup


Monday, December 17, 2012

Easy, Peasy Cheesy Spread


This is my entry for the Hush Hush week of Avant Garde Cookies. Priya Sreeram gave me an easy ingredient - cheese. And I had just stocked the fridge with Feta from the Indian store (never again since it was too salty, but perfect for the dish I made) and Gruyere from Trader Joes.
What to make??? I also had some paneer sitting in the fridge from a previous purchase, however it was not an option for this meal.

I have been cooking but blogging has been a luxury I have been unable to indulge in! Other priorities, kid applying to colleges, baking goodies for all the teachers and friends who have enriched our lives, horrific news that makes me want to sometimes curl up under the comforters with my children and never come out! Oft are the times I feel like taking them all back in my womb where I can keep them safe! If only that were an option! Kids grow up, get bigger than you, finish school and flee the nest in pursuit of their own destinies. As parents you have to learn to dwell on their success and not at the void they leave in the home as they do so!

I want a safe environment for the children and for all the people of the US. Many countries survive just fine with no weapons in their homes - I dream of a gun-free country where people once again learn to love their neighbors and let go of this built up hate and frustration.

Sorry to digress, this is after all a food blog and I am happy that is one thing that can please, made the right way :)


This was an uber delicious spread and a perfect addition to any dinner table and for entertainment.

Ingredients
1 pack of frozen peas (12oz)
1 onion
3 cloves of garlic
1 cup of gruyere cheese
1/4 cup of creamy Feta cheese
3 spicy green chilies
2 tomato
2tsp of olive oil


Method
Sautee until all veggies are cooked.
Add the Feta to the veggies and melt
Cool and grind and put in a baking dish
Add grated gruyere
Bake at 350 for 20 -25 mins

Serve as dip or spread


Wednesday, October 3, 2012

Green Chili Thokku (Preserve)


My garden was bursting with green chilies and we kept collecting in the hope that we would get some spicy ones - Alas to our disappointment, although they were extremely aromatic and flavorful and raised our expectations no end about its spiciness. Ironically, they lacked the sting which is a quality all of us proper South Indians look for in our green chilies.  We have learnt now that we have to plant the different varieties of chilies at least a 10 feet away from each other because what can happen if you plant spicy ones and sweeter peppers side by side, one takes over the flavor of the other, in our case the sweet dominated the spicy :(  So a lesson learnt for next year. Joke is I had to use store-bought green chilies and a few red chilies to spice up my chili chutney (lol)  But it smells phenomenally good and and tastes incredible, esp with thachu mammu or yogurt rice; a fab spread on sandwiches and with chappatis and cheese...

Presenting to you my Green Chili Thokku/Preserve - also sharing a couple of fun art I made with them.


Ingredients

  • 3lbs of Fresh green chilies 
  • 4 thai green chilies (not required if you have spicy chilies already)
  • 1/2 cup of urad dal
  • 1tsp of tamarind paste
  • 1/4 tsp of asafetida
  • 1tsp turmeric
  • 5tbsp Gingely/sesame oil
  • salt
  • Tempering with mustard seeds

Method

  1. de stem the chilies and keep ready
  2. In 2 tbsp of oil roast the urad dal until golden brown
  3. In a wide pan add 2 tbsp of oil and add the green chilies and allow them to cook until lightly browned
  4. Add the salt, tamarind and asafetida to this and stir for a little longer
  5. Cool and grind 
  6. Add a tbsp of raw sesame oil to the top to keep it preserved. Enjoy in any which way you want to :)

Chili Thokku

Friday, September 21, 2012

Chestnut Hummus


OK – I know that is a grammatically wrong way to start a sentence, but here is my narrative about how this hummus came to be. Enjoying a beautiful pre-fall day with good friends who had brought along some chestnuts to roast in the oven and serve.
Dinner was done and we decided it was time to roast these babies – I was really excited since this would be the first time I am tasting chestnuts – We have heard the Christmas song “chestnut roasting on an open fire..” crooned by several greats like Bing Crosby,  Nat King Cole and more recently, Michale Buble. But that was simply a song and in all my 19 years in North America, never once did I think to try it – Two years ago I may not have, but since I started the blog, my mind suddenly opened up like a never-ending avenue or better, promenade and I am enjoying so many new experiences.
Right… So here we are sitting on the carpet with a bowl of HOT chestnuts waiting to be cracked open fully (more labor than peeling boiled unshelled peanuts). Popped the first one in my mouth…. I was told my face was expressive enough to convey that I doubted my feelings for this and the best I could come up with was that these were a cultivated taste – I got some grief about that and our friend even jokingly mocked me – “now you will add some chili and other stuff to it and make it into something to submerge the taste of the nut.”
Not one bit true! Most of what I cook I take care does NOT lose itself and blend into the spices –
For starters, I just dipped them in Nutella and already it was tasting better. We do challenge ourselves to like certain things after a certain point in our lives, correct. I knew plain old chestnuts would not do it for me. We had a few nuts left behind from that night and this is what came out of it – A fabulously healthy and delicious hummus, where the taste of the nut prevails above all else, thank you very much!

Ingredients

  • 1 cup of roasted and shelled chestnuts (about 20 nuts)
  • 3 cloves of garlic
  • 1tsp of brown roasted sesame
  • 1red chili
  • salt a pinch
  • 2tsp olive oil
  • ¼ cup of water
  • 2tsp lemon juice
  •  

Method
  1. In a pan, add the oil and the chili first followed by all the ingredients
  2. Cook for a couple of minutes only until the chili turns brown
  3. Grind to a fine paste
  4. Garnish with Basil or mint (optional)
  5. Serve with warm bread or with a veggie platter

Chestnut Facts:
Gluten free
Complex Carbohydrates
Low to no fat
Low Cholesterol Food
Good protein albeit not very high
Rich in Vitamin C
In short, one of the best nuts to eat :)

This is a perfect post for my blog event FAST FOOD not FAT FOOD guest-hosted this time by my sweet friend, Archana of The Mad Scientist's Kitchen - Do send you entries to her if you have a healthy recipe you've made - 

Saturday, September 1, 2012

Gongura Chutney/ Sorrel Chutney/Spread


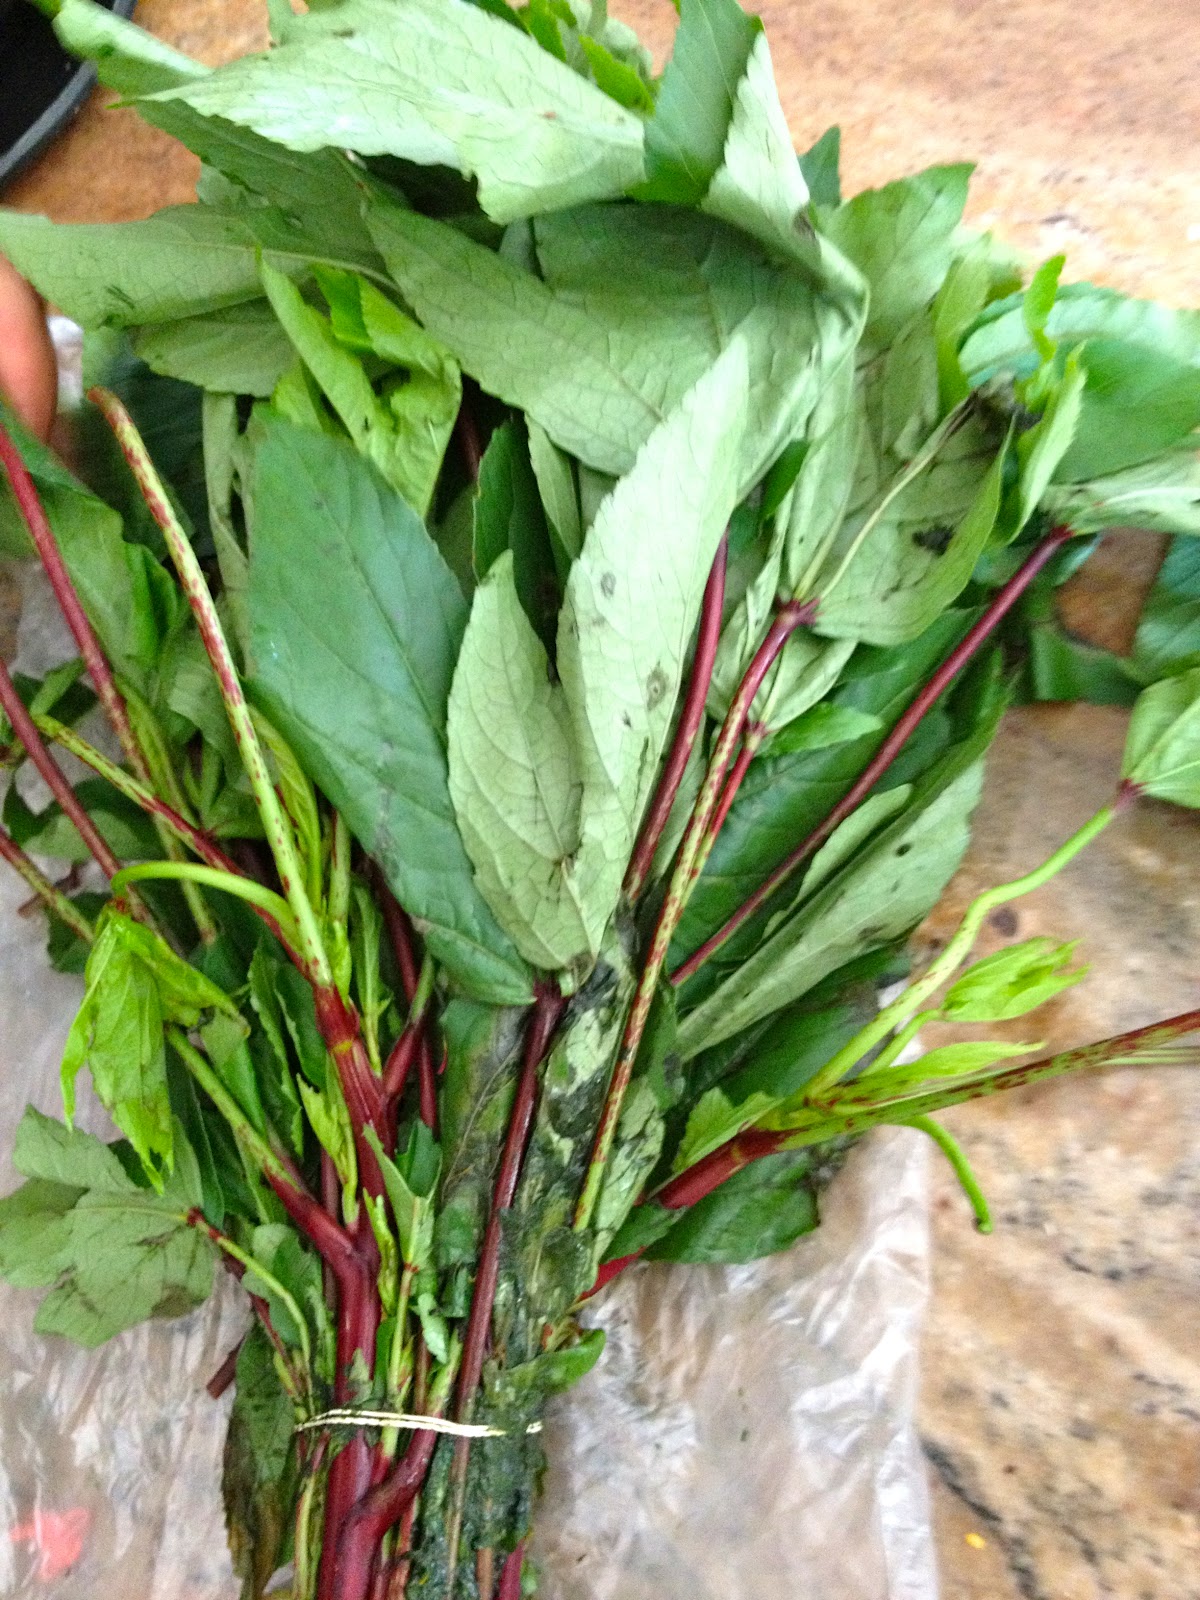
I have been saying it with Chutney's and spreads this summer from figs and goji berries to cherries and pesto. I now present Gongura chutney, a native dish of Andhra Pradhesh, well loved by Indians from all other parts of the country too :) For those who are not familiar with these beautiful greens, they have large crinkly leaves with a burgundy red stem and veins.  I had no idea what their English name was and got to it after several google searches. These greens have an innate sourness to them, something I was NOT aware of until after I added some tamarind, like we normally do for green leafy chutneys. I will not add tamarind to the recipe I have noted down for you. They are deliciously flavorful and serve as a great addition to the table in more ways than one - As a side to be had with yogurt rice, in the true south Indian style; to mix in with hot basmati rice and devoured; as a spread over a french baguette or with Indian lentil crepes, aka, Dosas, just to name a few.


Here is the recipe for this deadly delicious chutney

Ingredients


  • 1 bunch (about a pound) as sold in the Indian store
  • 1/4 cup of urad dal (black gram - ulundhu)
  • 1 tsp mustard seeds
  • 3 tbsp Sesame Oil
  • 2 Tbsp bengal gram (channa dal - Kadalai paruppu)
  • 6 really spicy dry red chilies (I got mine from the mexican store)
  • 1 lemon sized ball of jaggery (powdered)
  • 1/4 tsp asafetida
  • salt to taste


Method

  1. Wash the leaves several times to get rid of all the dirt off it and shake off the water
  2. In a wide (preferably non-stick pan) add the sesame oil and heat. 
  3. Add and pop the mustard seeds. 
  4. Add the chilies and allow them to roast for a minute without getting burnt
  5. Add the asafetida urad dal and the channa dal and roast until brown
  6. Add the leaves and turn it until they become a deep green bordering on brown. 
  7. Now add the powdered jaggery and the salt. 
  8. Turn for a minute until the jaggery melts.
  9. Grind in a food processor until the leaves are ground to a gritty paste.
  10. The Dals may not grind completely and may be semi-broken, but this is just fine because it add to the texture of the chutney. 
  11. DO NOT use any water to grind- the water from the leaves will suffice - 
  12. I used an additional 2 tsp of sesame oil and gave the processor one last turn before transferring to a bowl.


Enjoy in any way you want. And hope you'll like it as much as we did! It goes all too fast!


Wednesday, August 15, 2012

Presto Pesto


Homemade is always good. Homegrown even better - My mantra for this summer for those who have been tuning in. This is another of those beautifully satisfying posts of a most popular Italian Spread. I have tried to keep it authentic in that I added absolutely no "spicy hot stuff" and I want to say it tasted perfect - of course only judging by the gusto with which the kiddos spread away :)

My basil plants are still fledglings and while I got some of my basil from there, I have to thank my friend for allowing me to pick some from her wonderful garden.

The recipe without much further chitchat.

Ingredients
About 4 cups of basil leaves
1/2 cup of pine nuts
4 tbsp grated parmesan
2 tbsp grated Romano
1/4 cup of olive oil +1 tbsp
2 cloves of garlic
1/4 tsp salt

Method
Wash basil thoroughly
Remove basil leaves from the stem
Add all the ingredients to the food processor and blend until you get a coarse texture
Transfer into a serving dish - Add more olive oil and stir in.


Spread on french bread, have it in pasta or any which way you like
This is my green dish for Independence Day :)
And stay tuned for my Garden Fresh Gonkura Chutney.

Some pictures...


It turns dark as soon as you make it - stir to see the green above!


Tuesday, May 29, 2012

CherryKachal/ Thokku (Spicy Cherry Preserve)


When first tasted it after making this rather incredible thokku, almost in unison, my hubby and I declared it was cherry kachal - let it be known he said pulikachal  and gave me the idea to call it a cherry kachal.
Memorial weekend and nothing to do - WRONG - we went to a beautiful orchard set in a very scenic place about 45 minutes from where we live - the weather was perfect and there we were, six of us, my little one leading the pack, all armed with plastic bags. Long story short, we got SO carried away, we ended up with 20 lbs of cherries- Since they expect you to buy all of the cherries you pick, we ended up buying $80 worth of cherries :) !!! Not an issue since my head was immediately buzzing with the different things I can make with them - The pie was the first of course. When we came home, we got busy washing and sorting them into grades of ripeness. Before we made our way to the actual trees with the dark fully ripened cherries, our enthusiasm had led us to pick not so ripe ones - My three year old went about it with clear intent and picked a bunch of red, pink and semi-rotten ones - all part of the deal folks.
My kids, hubby and mother-in-law (who is visiting) took the lead role in washing, sorting, pitting process. While I got busy listening keenly to my good friend Stephanie from Joy of Baking, refreshing my pie-crust recipe.

That will be a post to follow. The semi ripe ones are the ones that I decided to make this thokku with.  I decided on a really simple recipe and let the cherries take on the spices and do what they will with it. And we ended up with a tangy, tongue-tickling thokku, perfect as a side for bondas, doasi and idli, or to mix with freshly prepared fluffy white rice :)


here is my recipe

ingredients
2lbs pitted semi-ripe cherries
5 green chilies
5 red dry chilies
1tbsp whole black peppers
2 tsp urad dal
2 tsp crushed rosemary
a small pinch of nutmeg
1/2 cup of gingely oil (sesame oil) (approx 6 tbsp)
salt


Preparation

Dry fry the green chilies, red chilies, peppers, urad dal and rosemary and dry grind into a powder.
Take 1/3 of the cherries (aprrox) and grind them coarse -
Add 2 tbsp of oil and and add the powder and roast for a minute.
Add the ground up cherries and the remaining pitted cherries into the pan
Add salt (about 3 tsp) and all it all to simmer and simmer and simmer in a low flame
in intervals of 5-7 minutes, keep adding a tbsp of oil until you've exhausted the oil
You will have a finely simmered thokku in about 45 minutes.

Allow it to cool down. Transfer into a mason jar. Refrigerate and use as needed.