Showing posts with label Cakes. Show all posts

Saturday, September 29, 2012

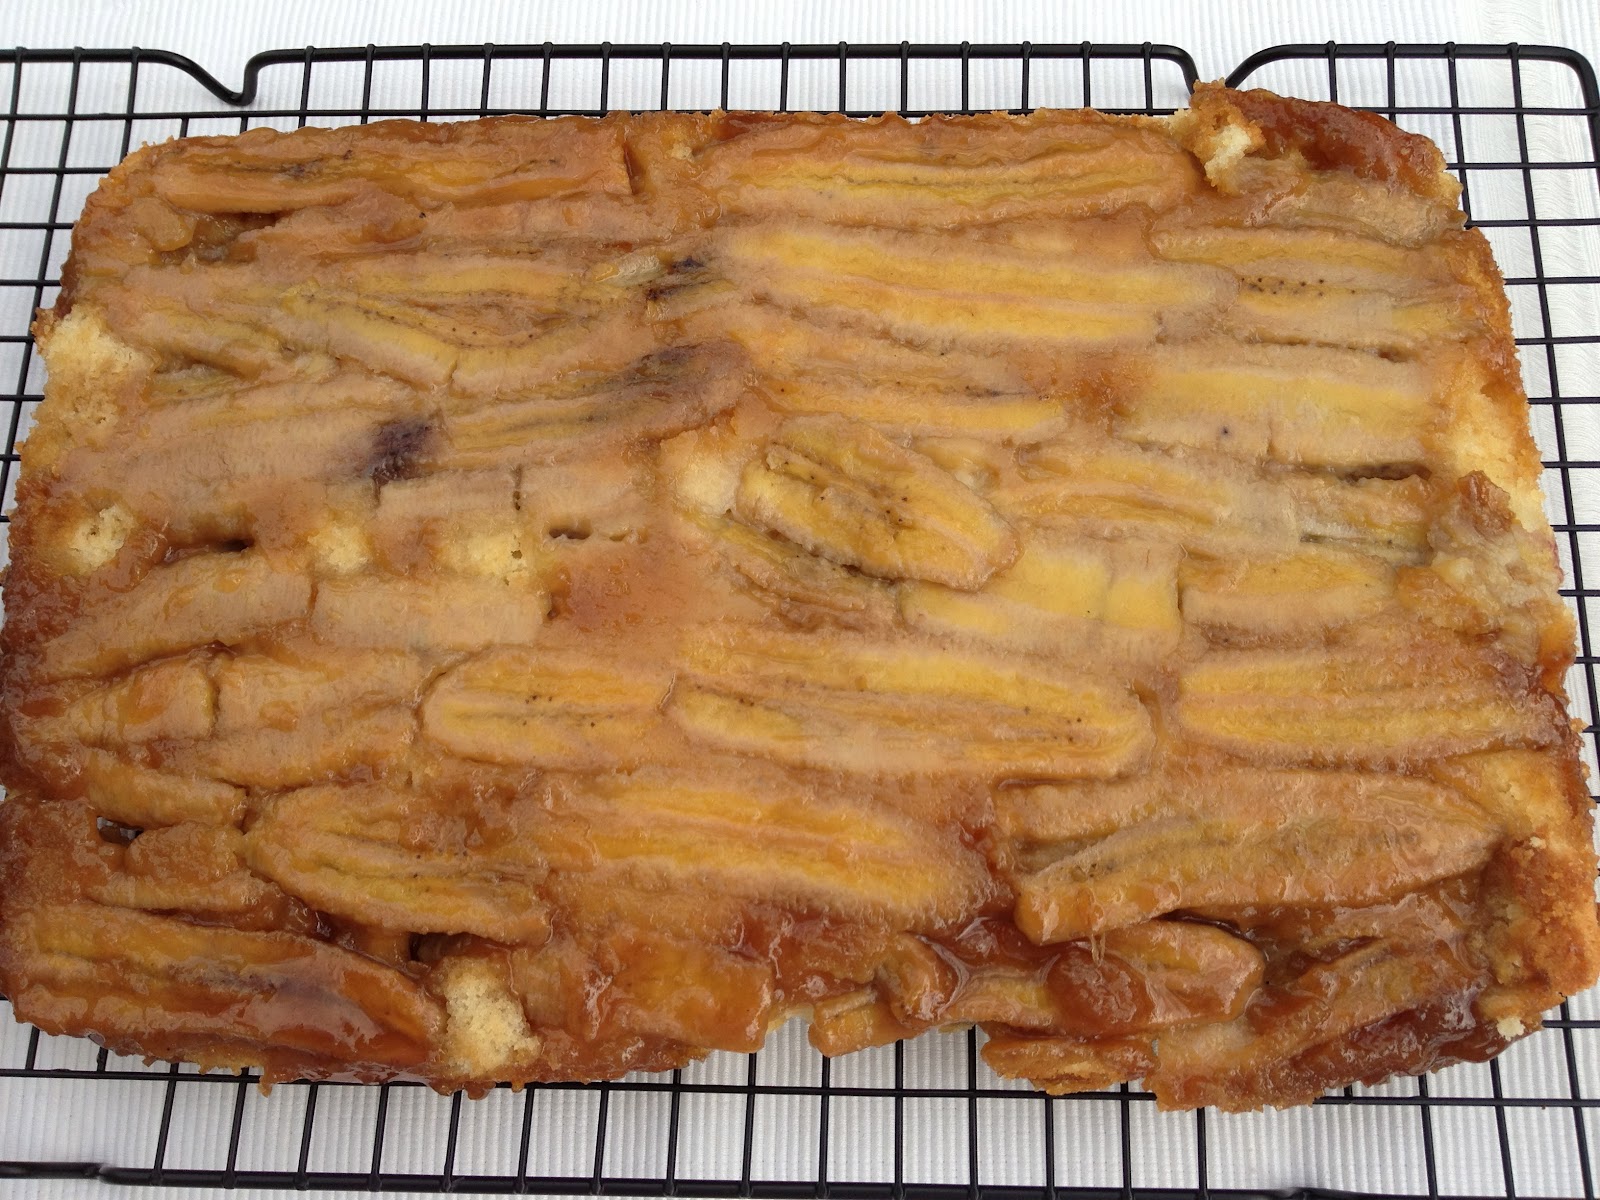
Banana Upside Down Cake


What do you do when you have a sweet craving? Sometimes you give in and go the whole nine yards and make something with what you've got. Thus came about this banana upside down cake. I has several super ripe bananas - hate those btw - and the only way I could imagine having them was in either a bread or with this recipe, in a cake. I used a recipe that I'd already tried out for the cake and just added the caramelized bananas...
Ingredients
  • ½ cup butter
  • 1 cup sugar
  • 2 large eggs
  • 1.5 cup all purpose flour
  • 1tsp baking powder
  • 4-6 ripe bananas
  • 3-4 tbsp Demerara sugar 


Preparation
  1. Preheat oven to 350
  2. Butter a 9 inch pan (I used pyrex)
  3. Cut bananas lengthwise and arrange neatly on the bottom of the pan
  4. Sprinkle the Demerara Sugar generously over the bananas
  5. Cream butter and sugar in a mixer
  6. Add eggs 1 at a time
  7. Then the flour with the baking powder
  8. Mix until it s a creamy batter (don’t over mix)
  9. Pour the cake batter evenly over the bananas making sure not to disturb the arrangement.
  10. Bake for about 30 -35 minutes or until the top of the cake is golden.
  11. Cool it before loosening the sides of the cake
  12. Gently invert on to a cake holder.
  13. The bananas should look glazed, caramelized and delicious. 
  14. Enjoy by itself of with a dollop of vanilla ice-cream.


Friday, May 4, 2012

Plum Kuchen - Celebrating Friendship


 So... this recipe has been in my files for almost a year - when I first met my beautiful Argentinian friend, Fla, who I do love dearly - She and I work together on other stuff and hit it off from day one - Although we are both a bit feisty- she more than me - something clicks and I've enjoyed having her in my life - She brings with her a familiar warmth and affection - very typical of Indians - where we are not afraid to feel or show that we feel - she shares the same wonderfully close relationship with her family and children that most of us Indians tend to with ours and there was not a moment when we felt any awkwardness in the relationship -
She was supposed to be a guest on my blog and share with me some Italian/ Argentinian recipes - She is of Italian origin. But we've had a deadlock about the interview part - I did what I have done with my other interviewees - sent her questions to answer about herself - She does not type these out and send it to me, instead, in this day and age of technology, wants me to physically take notes and paraphrase for her - Now for people who blog, you know how much work even putting out a recipe with pictures is - I held my ground that her answers would b typed by her and sent to me and I would post verbatim - The deadlock continues, but I gave her the heads up about posting some of the recipes she made for me - The first of the recipes that I absolutely LOVED was this plum cake - for Kuchen is nothing but "cake" in German.
Today was to be a special occasion - You see, I have 3 Anitas in my life who have enriched it a lot - My "french" friend whom I've known for almost 10 years now, who is as I write, hanging in Melbourne (so jealous), - She also introduced me to Fla whose cake I blog today; my fabulous baker friend Anita Gupta who has been a guest on my blog whose website, Maliha Creations is a sight for sore eyes.  And the third Anita, a UVA grad (soon to be) who teaches Zumba at the university - My Tuesday and Thursday nights were my most anticipated because she as my daughter rightly wrote, set the floor on fire and gave us all the most fabulous workouts - She may think I'm way over the top in my adoration of her, but she is truly an inspiration and I do love her a whole lot!
This last one was the one who was to come over today and the cake was made in her honor - But being a busy student trying to wrap up her undergrad program, she had to bail out of coming today - I am saddened by the thought that she will no longer be teaching here :( - c'est la vie - all good things do come to an end, mostly...no? But I must make the cake again for when she comes over -

I also want to celebrate all the beautiful friends I have made since writing this blog - so many great women out there - I celebrate you today as well -

But my thoughts go back to Fla who is away in Arizona, to attend her son's graduation - So I am dedicating her cake to that special event in her life - And a friendly word to her - Get back soon, woman- we have work to do!  As for Zumba Anita, a fresh cake in your honor is being planned :)


Ingredients

½ cup butter
1 cup sugar
2 large eggs
1 cup all purpose flour
1tsp baking powder
1 lb of red plums
Fresh lemon juice to squeeze over the cake before baking

Preparation

Preheat oven to 350
Butter a 9 inch pan (I used pyrex)
Cream butter and sugar
Add eggs 1 at a time
Then the flour with the baking powder
Mix until it s a creamy batter (don’t over mix)
Spread batter into the pan - NOTE - This batter is quite thick and will spread sort of thin in the pan
Cut the plums into halves or quarters depending on the size
Place them over the batter in rows
Sprinkle with 2 tbsp of sugar and add the lemon juice
Bake for 30 minutes on a regular oven not convection
Using pyrex glass can speed up the process
Do the toothpick check 


Enjoy mes amies, until the next post

This is off to BAKE FEST, Event hosted by me, started by Vardhini


Linking this to Divya's Showcase your dessert event


Monday, April 16, 2012

Rainbow Cake

Cake
Outside decoration with edible markers
A baby shower in Spring - Colors around the house so vibrant and inspiring - A rainbow cake it is, i decided having not so long ago seen this one! I also tried the cake recipe from the same blog!  Here was my chance to experiment with natural colors - You may recall my Rainbow Cheesecake, which I made with food coloring a milestone post of mine - This time I decided I would make it a lot healthier - as cakes go - and used a bunch of different coloring agents for this purpose - Also with my cheesecake, we poured the colors one after another from the middle and had them spread to the sides - whereas these are individual cakes that make up the rainbow.

Here are my coloring agents
Freshly Juiced blackberries 2-3 tbsp
Freshly juiced Strawberries 2-3 tbsp
Freshly juiced blueberries 3-4 tbsp
Freshly juiced carrot  - 3-4 tbsp
Freshly juiced Spinach -3-4 tbsp
Saffron for Yellow - 6-8 threads
Rose Syrup (from Indian Store) for bright Rose
NOTE: All the colors get twice enhanced when they are baked - so don NOT be disheartened if the colors appear pale as you mix them in - I was a bit concerned but got with it soon enough :)

I would follow the white cake recipe from Joys of Baking or another renowned site - the cake that went with this recipe tasted awesome, but they initially dried up a bit and I fixed it by using sugar and evaporated milk - The end result was incredibly soft and completely flavorful cake - The Vanilla extract completely camouflages any smells of the spinach.
It was so much fun making the buttercream - I was blown away by how much was required and how labor-intensive a cake such as this one can be - But we do not make rainbow cakes everyday  and even one color at any given time will suffice -

Our cake expert, Anita Gupta gave me the recipe for the buttercream
Here it is  -
  • 5 large Egg whites beaten to stiff but not dry peaks
  • 1 1/4 cup Granulated Sugar
  • 1/3 cup water
  • pinch of Cream of tartar 
  • 3 sticks (12 oz.) salted butter cut into small pieces, semi cold
  • 2 teaspoons Vanilla
  • 1/2 capful orange extract

Instructions


  • Cook sugar, cream of tartar and water in a small saucepan over medium high heat, stir until sugar dissolves and syrup begins to boil. Cook to 240 degrees. Remove butter from fridge while syrup is cooking, set aside
  • Cut your butter into small pieces and leave in fridge while cooking syrup. 
  • Beat the egg whites in KitchenAid bowl with wire whisk attachment. Stiff, but not dry peaks.Turn mixer speed to medium low and pour the cooked sugar syrup at a steady stream, not too slow but not all at once either. Pour between the beater and the side of bowl to prevent splashing. Turn mixer to high speed and beat until the outside of bowl feels cool to the palms of your hands. 
  • Change to the paddle mixer attachment, turn speed to medium low and add butter a few pieces at a time till it is all used and begins to combine, turn mixer speed to high and beat until the outside of the bowl feels cold to the palms of your hands and mixture has begun to come together, looks fluffy and shiny. Add the flavorings and beat till well combined.If mixture looks curdled or separated it may be because the syrup wasn’t cooked to 240 degrees, you pour the cooked syrup in too quickly, or you added the butter too quickly and it may have been too warm. It needs to have a slight chill to it. 
  • You can still salvage the icing, continue to beat on high speed until it comes together and is fluffy. If you end up with a soupy mixture at the bottom put the mixer bowl and paddle attachment in the fridge for about 10 minutes. Beat again on low speed until it begins to come together, than turn speed to high and beat until fluffy and shiny.
Now for the pictorial


Rainbow cake collage
Follow recipe to make cake batter  - add the color to it
Cakes
Fresh from the oven


cakes dyes
The flavors

Cake
The stack before and after torting (looked like a leaning power of Pisa before being sliced down the middle yielding 2 mega cakes :)

Rainbow cake
Torting is slicing the cake down the middle - can be done with dental floss  
Torting the cake with a dental floss -this is a superlative and stress free idea - You must try it!
Cake
The buttercream

With a wedge cut off - first glance at the result
Thankfully a piece got photographed!! :)

To top this we were blessed with a real rainbow (I call it Shrey's rainbow since she spotted it and was SO excited to be the one to ) 
Untitled
Ended up being a double rainbow -to match the 2 cakes - what are the odds ;)
rainbow
The second rainbow is clearer in this one!
This was a wonderful experience and I got to do it with a friend which made it all the more doable :) These are projects to do with a friend or family member - the experience becomes that much funner!
Adios Amigos until my next post!

Thursday, September 22, 2011

Celebration Begins With ... A Rainbow Cheesecake

Cheesecake
Rainbow Cheesecake
The minute I saw this, I knew I had found the perfect recipe for my baby’s birthday and the perfect post for the day – Now I am not too sure how much of this my little 3 yr. old will consume, but a challenge was what I was seeking, esp. since it is also close to my blog’s 1st anniversary (Please stay tuned on Sept 24th for many wonderful giveaways) I figured it doubled the cause for celebration – I was anxious about making this on my own – So I called upon my dear and sweet friend to ask if she would help me with it – The artist that she is, she was immediately enthused by the challenge and the idea of mixing the colors of the rainbow just right and together we had plenty of fun making this! This is truly a recipe that you would find a LOT easier to make with a friend, daughter or mother because it can be a little overwhelming! Grazie mille, Fla, may not have attempted it without your help and nifty guidance!
This cake contains more fat calories than I can count, but hey, when has there ever been a celebration without a good bit of fat to cheer us up! It also goes against most of the things I strive towards –aka – healthy recipes, but a sliver thin slice would be perfectly ok! So let’s chill on this subject :)

I got my recipe from Macheesmo - I have copied almost verbatim his ingredients and his method of preparation -  Hope you enjoy my pictorial of it so that it will be easy for you to recreate! Enjoy mes amies!
Rainbow Cheesecake

Ingredients
2 Cups graham crackers, crushed (crust)
2 Tablespoons sugar (crust)
6 Tablespoons unsalted butter (crust)
1/2 Teaspoon Cinnamon (crust)
1 Pinch Salt (crust)
2 Pounds Cream cheese, room temp
1 1/3 Cups Sugar
2 Teaspoons Vanilla
4 Large Eggs
1Cup Sour Cream
1Cup Heavy Cream
1 Pinch Salt
1 Container Food colors (blue, yellow, green, red)

Rainbow cheesecake


Preparation
  1. Before you get started with the crust, make sure your spring form pan is watertight. I do this by carefully wrapping a few layers of foil on the outside of the pan, working in both directions so water cannot get into the pan. Be careful not to rip the foil or water will get into your cake and ruin it!
  2. To make the crust, grind the graham crackers in a food processor until very fine. Then mix crushed crackers, salt, sugar, and cinnamon together in a bowl. Then mix in butter with your clean fingers.
  3. Press all but a few tablespoons of the graham cracker mixture into the prepared spring form pan. (Save a bit of the crust mixture in case there are holes later) Press it down firmly in the pan. I like to use a measuring cup for this to make it easy to get around the edges. You should have an even, flat crust.
  4. Bake the crust in a pre-heated 350 degrees oven for 10 minutes on a low rack. Remove from the oven and cool completely before continuing. Turn oven temp down to 325.
  5. To make filling, cut cream cheese into pieces and add to a mixing bowl. Whip until smooth, maybe 4 minutes. Then add sugar and continue to beat until smooth again, another 4-5 minutes. Next, add salt, vanilla, and one egg at a time, beating briefly between each egg. Finally, beat in the sour cream and heavy cream.
  6. Once the mixture is well combined and very smooth, divide it into 6 dishes. Add food coloring to each dish to get the desired colors.
  7. Pour colored mixtures into prepared dish with cooled crust. Start with red and pour it right in the center. Continue to build the rainbow by pouring the fillings directly in the center. This will create layers so that each slice has some of each color.
  8. Place cheesecake into a baking dish a fill with boiling water about 1 inch up the side of the spring form pan (pray that your dish is waterproof).
  9. Bake at 325 degrees in the water bath for one hour and 45 minutes.
  10. Turn off the oven, crack the door to the oven, and let the cake cool in the oven for one hour. The slow cooling will help it not crack.
  11. Then loosely wrap the dish in foil so the foil isn't touching the top of the cake and refrigerate for at least 4 hours.
  12. When ready to remove cake, run a clean narrow knife around the edge of the dish, remove the foil, unlock the spring, and carefully lift off the outer ring.
rainbow Cheesecake 2
First steps of preparation

Cheese Cake - Rainbow
Now the Fun begins - From Second picture on right as you view it to the center
Cheesecake

Cheesecake


NOTE 1: My oven was obviously either newer or more efficient that the parent site for this recipe! – So I would advise caution and let it bake for 1hr and 30mins as opposed to 1hr and 45 minutes. Luckily, the slightly browned top did nothing to mar the taste or the enjoyment of this cake.


NOTE 2: Although the pictures from my source looks PERFECT, a thicker crust might have worked better to keep the cake together while cutting – I may play around with that the next time

NOTE 3:Keep cake refrigerated overnight – Keep water and a paper towel handy while cutting the cake so that you don’t mess up the colors –

NOTE 4: Not a good idea to travel 25 minutes with this cake unless you have a freezer box/pack in which you can transport it – I took this to my baby’s school and the children liked it, I think what they enjoyed most was delving into the gooey mush that they could so easily make it – but I say not too bad for a first attemptJ
Sending this off to Friday Potluck, at Ekat's Kitchen :)


Powered by eRecipe.com