Sunday, October 30, 2011

Steamed Green Beans Salad

Green beans salad

Here is the back story - a true record of a conversation I had with myself :)
Fresh, tender beans stacked beautifully, so much so allz you need do is clip the pointed ends and steam them for about 3-4 minutes in your microwave - I say keep talking - in a flat large pan, saute in 1/2 tsp of olive oil, 2 cloves of garlic, cut like thin & flat along with 1/2 tsp of crushed red peppers- Getting more interesting, keep going, I encouraged myself - Well,  add the steamed beans to this and sprinkle salt and turn in the pan, keeping them whole & in shape. Okay and .... Well now you take about 20 pieces of almonds, cut flat with their skins on and sprinkle and serve HOT ...My alter ego says, Okay lemme taste this first (a chewing pause before) OMG, that is SOOOO delicious - Can I try some more, I say reaching out to grab a few when splat came my other hand clamping over the stealing one saying in a semi-stern tone - Ah ah ah... wait till its on the dining table along with the rest of the food, or you'll get nothing then...

There you have it. Now for the pictures and remember if you see these beans in the store, snap them up -this can be made in 10 minutes flat :)

Steamed Green Beans Salad

My late and last entry for the Blogging Marathon -

Cheers and wishing you a healthy week and extreme enjoyment and joy in the simpler recipes of life :)

Check out the other Bloggers in this Marathon

Friday, October 28, 2011

Baby Spinach & Plum Salad

Spinach Plum Salad

So here's my next salad for Srivalli's Blogging Marathon, and I chose to to Salad and Soups - sorry I have been salad heavy, but those are my daly lunch (almost) and it was fun to try out a different salad each day - Salad is to me things that I like or even love coming together in a simple and healthy form! I always garnish my salads with nuts, just to have that crunch to it and make it more appealing :) I did use my Balsmaic vinaigrette (Charles, tune in here :)

1.5 cups of Baby Spinach leaves
1/2 a plum
10-pinenuts
A dribble of Balsamic Vinaigrette

Check out the other Bloggers in this Marathon
Spinach & Plum Salad


Thursday, October 27, 2011

Apple & Cottage Cheese Salad

Happy Deepavali greetings all - Hope you had a wonderful celebration - The first 4 hours of mine were spent cleaning my Lakshmi lamp :) I am sorry I could not post yesterday on account of working hard to keep the spirit of Deepavali alive for my kids in the place so far from home or even a bigger city where there might have been some community celebration - But here is a super simple salad, packed with protein that I made this afternoon -

1/2 apple - cubed
2Tbsp -cottage cheese, small curd
about 10 broken walnut pieces
1/2tsp of honey (optional)

Place in a bowl in the given order and dig in  - Hope to come back with another simple one tomorrow - Sorry I am not editing my photos today :(

Priya's Now Serving Apple-Cottage Cheese-Walnut Salad


Tuesday, October 25, 2011

Arugula & Fresh Mozzarella Salad


arugula mozarrella salad

Please don't kill me - This is yet again an Arugula based salad -  (A blogger friend just informed me that these are called rockets in England so I was tempted to change the title to Rocket & Mozzarella Salad - what can I say except I love these greens and they have made my salad experience incredibly enriched... Take a look at this fresh green leaf below and tell me you are not tempted :)

arugula salad
This time I paired it with Oh-So Fresh Mozzarella cheese and juicy beef tomatoes (not particularly fond of that name but...)
The dressing a simple store bought, fat-free Annie's Raspberry Vinaigrette - start with smaller drizzles and add more if necessary - the trouble with store-bought being they can get taste acidic.

Pictures are self-explanatory, but the single serving remains the same
Arugula & Mozzarella Salad

For 1 Serving
2 cups of fresh, washed arugula
3 - 1" thick slices - These come pre cut and can be sliced thinner if desired)
Note This can be substituted with Tofu or Paneer if desired
3 fairly thick slices of tomatoes

Place the bed of Arugula and arrange tomatoes over it
Add the Mozzarella pieces over the tomatoes and there you have it
Drizzle dressing over it and enjoy
Arugula Salad
This was shared by 4 adults who love salad :)

Monday, October 24, 2011

Apple & Arugula Salad

Apple & Arugula

After the comments I got for my Arugula Salad, I realize that Arugula may not be so popularly known - so let me inform you that it is one of the best salad greens - I am not a fan of lettuce and I far prefer spinach and even more so Arugula as the green salad base - So please if you see some fresh arugula, make a swipe for it :) and you won't regret it - it contains none of the bitterness that romaine and often red cabbage/lettuce do -

I split the pack I got over 2 days to make 2 different salads out of them - In this recipe, I used apples - Here again, call me an apple snob, but I am not fond of any apple except the following - Pink ladies or Honey crisp - For a salad, you want an apple that feels crunchy, that is juicy, that has a thinner skin, that has a beautiful blend of sweetness and sourness - Fuji, Gala, Jazz etc are a far second to the first mentioned apples - We get the mavu (pasty) kinds in India supposedly from Kashmir - could never stand them - matter of fact, can't say I've tasted any that I liked in india - Apple to me was a cultivated taste that came with eating the Pink Ladies - Those are I believe a product of New Zealand - I could move to NZ just for these, and the untouched, pristine, intensely beautiful scenery would be just a perk (lol)
Pink Lady apples are a dollar per - but totally worth it, but sometimes you may be lucky and hit a sale1

All kidding apart, if you don't like apples, pick a fruit that pleases you and use that - I love anaar, but we do not find them here :(

Apple Arugula

For individual servings
2 cups of FRESH, washed and dried arugula (all these pack say pre-washed, but I wash them anyway, just in case
1/2 Apple (Pink Lady or Honey Crisp) with skin cut into thin slivers
2Tbsp Cottage Cheese (low fat, small curd)

 Cherry Juice-Mustard Dressing (very low fat)

2Tbsp Pure Cherry Juice (can be substituted with any other 100% juice that is available and liked)
1 squirt (bout 1/4 inch) of Dijon Mustard or other
Whip until mustard is nicely mixed into the juice
Drizzle generously over salad
Grate mozzarella or fresh parmesan (optional)
Dig in :)
This is my second recipe for Valli’s Blogging Marathon  and my theme is Salads and Soups

AA Salad

Check out the other Bloggers in this Marathon

Sunday, October 23, 2011

Nutty Arugula & Strawberry Salad

Kicking of second week of Valli’s Blogging Marathon with this super salad
Arugula-Strawberry Salad

The key to a green salad is FRESH greens – cannot emphasize that enough J
This is a salad that can be thrown together in a matter of minutes (much like any greens based salad) – Tastes delicious and even my salad-hater daughter has been converted to a fan – Salad is a food that needs to be exciting, with at least 2 things you can see in it that say, Hey, I could eat this salad for that ingredient - Or at least that is the philosophy that I subscribe to, not having been a much of a salad person either – give it to me cooked any day, I said until I learned to make a mean salad which was at once healthy and pleasurable – So try this one
Prep time: 10 minutes or less
For a single portion for Salad
2 cups FRESH Arugula (wash & spin dry or dab with paper towel)
2 strawberries diced from top to bottom
1tbsp walnut – crushed
1tsp peanuts (optional)
Grated Parmesan garnish (optional)
Nutty Arugula Salad

Here is a wonderful 10- minute recipe for a no or very, very, low fat dressing
Again this for a single portion of dressing
2tbsp Low fat yogurt
2tsp agave nectar
1/2tsp garlic flakes
Fresh ground pepper (pepper mill)
Whip these together and drizzle over salad

Ta-dah – gourmet salad good to gorge on 

nutty arugula salad

Saturday, October 22, 2011

Indus Ladies E Recipe Book & Strawberry Shortcake Cookies

This is an awesome and time book that Indus ladies has compiled as an e-recipe book - This is available for free download here - I am once again happy to share that my Strawberry Payasum was included as recipe #100 - A last minute entry since I only knew before I submitted that i could send an archived recipe, thanks to Priya Sreeram.  As only daughters can, mine is convinced that they saved the best for last :) There are many wonderful recipes from many of my blogger friends which are also listed - so download and enjoy :)

A quickie post for today - Driving older daughter around, younger one not napping, making dish for a blues concert -party - so I just pulled this out of my archives and decided to blog it now -
Day 7 of the blogging marathon # 9
These shortcake cookies caught my attention when I saw them on Tracy’s Culinary Adventures website I decided to make them Click here for the original recipe  Only thing I'd have done differently is cut my strawberries a little smaller or even crushed them

SSCC2
SSCC1

Check out the other Bloggers in this Marathon

Friday, October 21, 2011

Bridal Shower For Nithya - Bombay Chutney & Apple Capsicum Couscous

Today is a day to rejoice the forthcoming wedding of a most gifted and talented blogger, Nithya Rajasekaran -


The day a girl becomes a bride, is like no other. It is one of the few most cherished moments of life. It is the day she embarks the new journey of life. Holding someone's hand, with dreams in heart and sparkle in the eyes. Having mixed feelings of missing her mother's home, excited and anxious about the new home. It is indeed a special day for her!! Very soon one of our friends, a lovely blogger and a beautiful photographer, is going to enter into wedlock. I believe you would have guessed who it is by now. For those who are still wondering, it is none other than Nithya of 4thsensecooking, who is getting married this November. (Hard to believe she has such a fine collection of recipes already under her belt)

Thanks to the advent of technology, the world has become very small. 
Though nothing can equal the joy of celebration in person, we all would want to wish her and celebrate with her, the most joyous period of her life. Here we are all, united, to wish her all the best and a very Happy Married Life. So today we are throwing this virtual bridal shower for Nithya to express our happiness and to celebrate with her.


And what could be a better way to celebrate than with food, the quintessential subject, that binds us all... So we decided to cook it up, literally and that too Nithya's own dishes from her own blog - 4thsensecooking. I had chosen to make her Kaju Murrukus which I fell in love with but with all of us watching our weight and time being a little rushed, I decided to make Bombay Chutney, a dish which was very well-loved by all - Hope she likes the recreation of her own favorite dishes and gets a taste of it through the world wide web. See Nithya's recipe here. thank you Anamika for organizing this - What a wonderful gesture :) So glad to be part of it!

Bombay chutney


Ingredients:

Gram flour or chick pea flour(Besan/Kadala maavu) – 1/2 cup
Water - 1 1/2 cup
Asafoetida(perungayam) - a pinch
Turmeric powder - 1/4 tsp
Onion - 1
Tomato - 2
Green chillies - 2

Bell pepper or Capsicum (1/2 medium sized chopped)Garlic - 4 pods
Fennel(Saunf / Sombu) - 1 tsp (I replaced with Cumin since I did not have fennel seeds)
Cinnamon(pattai) - 1/2 inch piece (used 1 tsp of my curry ma podi instead)
Urad dhall - 1/2 tsp
Channa dhall - 1/2 tsp
Mustard - 1/2 tsp
Curry leaves

Salt - for taste


Bombay Chutney


Bombay Chutney
The process colorfully told :)
Preparation (from Nithya's blog)
Chop the onion and tomatoes into cubes and slit the chilies. Dice the garlic pods finely. 
Dilute gram flour, turmeric powder and salt in the water and keep it ready. 
Take two tsp of oil in a pan and splutter mustard seeds, urad dhall and channa dhall. Drop in the curry leaves, chilly and fry for a min. Now add the chopped onion, tomato and garlic and fry until onion turns transparent. 
Now add the ground saunf and cinnamon powder. Reduce the flame to the lowest mark and pour the gram flour water mixture while stirring continuously. Now increase the flame slightly and keep stirring until it gets cooked and becomes slightly thick and glossy. 
Add chopped coriander leaves at this stage if desired and collected in the serving bowl. 
Simple and quick Bombay chutney or Bombay Masala is ready to serve :) 
Serve it hot with chapathi or poori. 

The complied feast for the shower :)


And Nithya, this one's to salute your creativity :) I ended up making a capsicum couscous


Apple-Capsicum Couscous

AC couscous

Ingredients
1 Cup French couscous (sprouted) 
1/2 apple
1 capsicum
1/2 cup fresh spinach leaves
1-2 green chilies (mine are green turned red :)
1/2 cup chopped mushrooms
1/4 cup Grated coconut 
1 tsp grated ginger
1 tsp crushed bay leaves
1/2 tsp mustard seeds, urad dal for tempering
1tsp olive oil

Apple C Couscous

Preparation
Chop the apple and the capsicum into small pieces
slit the green chilies and grate the ginger and keep ready
In 2 cups of water, cook the couscous until soft and fluffy
In a wide mouthed pan, heat the oil and pop the mustard, following up with the urad dal 
When the dal is golden, add the chopped veggies & fruit and chilies, bay leaves and saute for a bit
Now add the curry powder and salt
When the capsicum (bell pepper) is semi-soft, add the cooked couscous to the pan and stir in with the curry. 
Now add the grated coconut and turn it once
Garnish with your choice of nuts, and basil
Healthy one pot meal is ready to eat :)


Nithya's Party is also being hosted on these blogs

Party also being hosted at:
Anamika Arun - Taste Junction
Krithi - Krithi's Kitchen
Priya Mitharwal -  Mharo Rajasthan Recipes
Priya Mahadeven - Priyas Now Serving
Priya Suresh - Priya easy n tasty recipes
Priya Sreeram - Bon Appetit
Radhika - Tickling Palates
Revathy - Kaarasaaram
Sanjeeta - Different Strokes
Vardhini - Zesty Palette

Rupali - RecipeGrabBag


Check out the other Bloggers in this Marathon

Thursday, October 20, 2011

Papaya Marmalade - A Tribute to an Inspirational Woman & Blogger


Papaya Marmalade 2


Jayashree Satish of Kailas Kitchen

Priya MahadevanJayasree Kailas Kitchen
Hi Jayasree Kailas Kitchen, just read that you are from Pune - lots of family there and my base in India :)
Like ·  · 29 July at 14:11 ·
Harini Rupanagudi my brother is currently posted in Pune too :)
29 July at 14:55 · Like

Jayasree Kailas Kitchen ‎Priya Mahadevan, Harini Rupanagudi - nice to know you have base/contacts in Pune. Its going to be a year since I moved to Pune. Hope to meet you both during your next visit to Pune.
30 July at 00:43 · Unlike · 2 people (that was me and Harini)

The shock of reading of Jayashree’s passing on Niv Mani’s post really had me reeling in disbelief!  I was very, very, very, distraught –I could not sleep from the shock and my husband and kids were so understanding, so sweet trying to console me! --We are not aware as we make new friendships, virtual though they may be nowadays, how close we become and how strongly an incident like this can affect and shake you up – besides drilling home the fact that life is so fleeting, it has you thinking about how to lead it and while you still have a chance to make sure that you have only spread sweetness and love to those around you and leave fond, lasting memories in the hearts and lives you’ve touched –Make the memories count!  This is truly what Jayashree has done for me – Our interactions were not many, but from the get go, from loving the name of her blog, and her simple and clear cut recipes right down to the wonderful, encouraging comments I received from her every time, I only always have had a positive image of her and from the conversation above, you’ll understand what a warm and welcoming person she was J -   The devotion and the enthusiasm with which she celebrated every festival and supported so many wonderful and worthy causes – yes, I did spend a couple of hours going through her Facebook account and trying to get to know this person who had passed, but who had entrenched herself in my life in some indelible way and enriched it. She loved life and I am kind of mad at the Gods for taking someone who was so full of joie de vivre away so young, so suddently – But then I turn around and I pray to the same Gods, Satya Sai Baba and Shirdi Baba to give her loving family the strength to deal with this enormous loss – I know she would have thrown herself and celebrated Deepavali in a grand manner and shared with us her efforts of dedication – So I hope I and far more importantly, her family and people who knew her well can salute her spirit this coming Deepavali Like I already said on her FB page, she will set up her Kailash Kitchen for the Gods above, in Lord Shiva's heavenly abode :)


To all my blogger friends and followers of this blog, let me tell you one more time how much you mean to me and how much I value our friendship, virtual or otherwise. Love you! 

My small tribute in her memory, I make this Papaya Marmalade in her honor from her wonderful collection of recipes.

PM3

Ingredients

1/2 a ripe papaya (about 1 cup)
Juice of 1 orange
Zest of 1 orange (used for juicing)
1/2 cup of Agave nectar
1/2 cup or Orange blossom honey
3 cloves crushed

Papaya Marmalade

Preparation

Roughly dice your papayas since you are grinding it anyway
Juice your orange and zest the rind and keep
Measure the honey and agave
In a blender, add the papayas, orange juice, agave and honey and crushed cloves and spin until it's a smooth blend
Pour in a deep saucepan and start cooking on high flame for 5-7 minutes stirring the sides
Then reduce flame and cook for  15-16 minutes in installments of 5 - 5- 3- 3 -
By this time, it has reduced to 1/4 of its original amount and has thickened considerably
Test by dipping the ladle in and it should have Jam sticking to it as opposed to running down

Cool for 10 minutes, put in a clean jan and refrigerate  - Enjoy with Toast, english muffins, crumpets and pancakes, just to name a few :)

Here are some pictures - Also stay tuned for some Pineapple Jam from Jayashree blog that I plan to make for tomorrow's post.
Also Check out the other Bloggers in this Marathon
Papaya Marmalade collage

Wednesday, October 19, 2011

Atta Chakuli For Blogging Marathon and Blog Hop Wendesday

Atta Chakuli

This was a tricky situation - I had bookmarked a couple of recipes from Mugda's blog Cooking Fundas, whom I am paired with for Blog Hop Wednesday started by Radhika and at the same time, I had this desire to do the Blogging Marathon with Valli and Co - What's poor me gonna do except conceive of a master plan to keep both my commitments with one post, so that I could stick to my theme of cooking with fruits for the blogging marathon - For this I really had to scour Mugda's blog to get a recipe with fruits and I found it in the least likely place in the dosa section - This is what I would called a mix between a karacha dosai (Rava dosais) and pancakes - The kids returned from school a few moments ago and had them hot and LOVED them so much, So thank you my dear Mugdha for adding a new& yummy recipe to our home :)

I had to modify a bit because I did not have aniseeds and I really forgot to add the coconut altho I was so excited about seeing it on the recipe - happens when one has a sick child and two older ones coming home hungry :(
I have to get back to dinner making so I better rush this one out :)

Ingredients
1/2 cup Rava (cream of wheat)
1/2 Whole wheat flour (chakki atta)
2 tsp sugar
1 tsp cumin
1 banana
A pinch of salt
Pam olive oil or butter spray
NO oil :)
atta chakuli

Preparation

Before I get on with directions, let me clarify that a no oil preparation is only possible if you have a non-stick pan
1) Mash bananas to fine pulp
2) In a bowl, mix the cream of wheat, atta, cumin & sugar
3) Add the banana pulp and mix in well
4) Dilute by adding water to the consistency of a dosai or pancake
5) Heat pan and make 4-5 inch sized chakulis

Ready in 15 -20 minutes start to finish

Check out the other Bloggers in this Marathon

Check here for my friends doing the Blog Hop Wednesday --


Tuesday, October 18, 2011

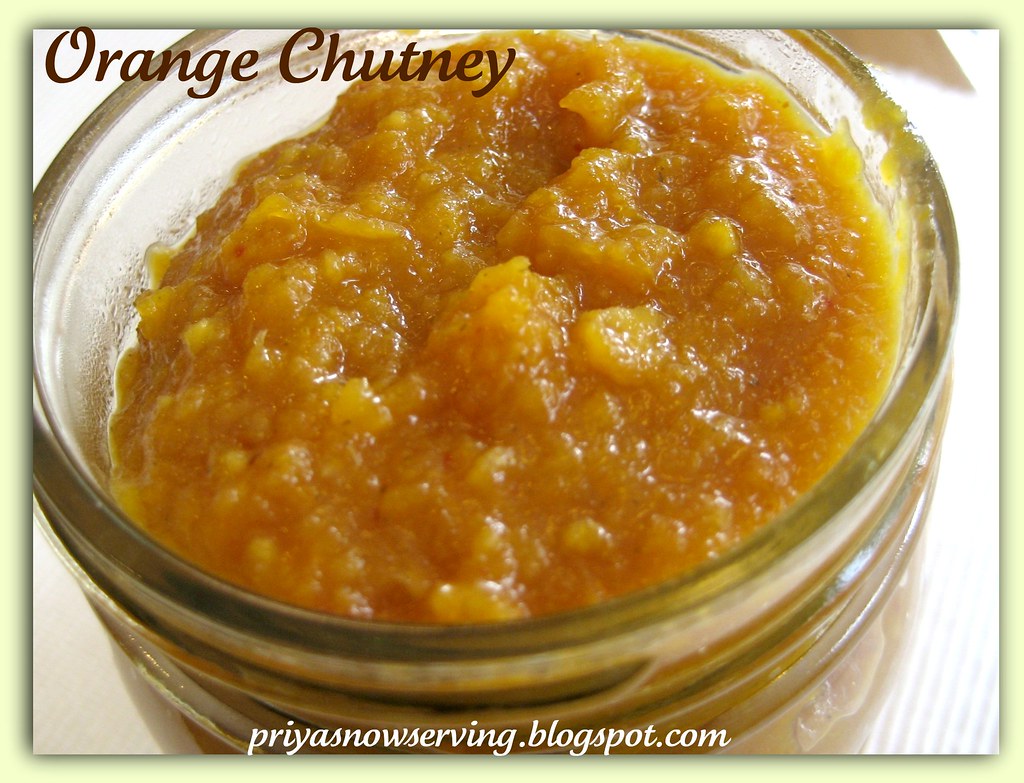
Orange Chutney

Orange Chutney
Add caption
 This idea came about as I was talking to my sweet friend - who was making an orange marmalade (which will hopefully feature in my next guest post as of now scheduled for either November 2011 or Jan 2012) She asked me to come up with a good recipe for an Indianized orange chutney and this is what I came up with - It is truly a chutney for all cravings with its sweet, sour and spicy flavors. A must try for those who like to have a preserve which can be used in more ways than one - My recommendation is to have it with yogurt rice - Heavenly my maties
Orange Chutney
Add caption
This is the 3rd day of the blogging marathon started by Srivalli and my theme is Cooking with Fruits

Ingredients
2 Oranges with rind
1 cup of Jaggery (unrefined sugar) (Increase amount to 1 cup if you desire a sweeter chutney)
3-4 dried red chilies (reduce or increase based on need)
2-3 mint leaves
1 tbsp grated ginger
Juice of 1 lemon
1tbsp sesame oil
1tbsp urad dal
Zest of the 2 oranges (that are being used) and 1 lemon (that is also being used for juice)

Preparation
Soak the zest of the 2 oranges and the lemon in the lemon juice along with the grated ginger
Remove pith and any pips and cut into small bits
Measure 1 cup of jiggery and add to the orange bits in a deep saucepan
Heat oil in a small shallow pan
Add the red chilies and the urad dal and fry until the dal is golden brown
Cook the orange and jiggery for 2 minutes exactly and remove from flame and grind into a coarse paste
Add back into the saucepan and continue cooking
Once the chilies and urad dal are cool, grind them up with the soaked zest juice
Make sure this is a finely blended
Now, add this to the orange jaggery mix and let it all cook for another 2 minutes – Now you will notice that the chutney /relish is thickening and slightly brown from the jaggery
Remove from flame – taste to see if you want to add more jaggery/red chilies
If you find it dancing on your tongue like I did, put in the fridge to cool it down and use it as desired, with toast, chappatis or dosais and idlis!
Check out the other Bloggers in this Marathon


Bon appetite! 
Steps in Pictures
Orange chutney collage


orange chutney 2

Orange Chutney


Orange Chutney
Preserve in a Jar


Monday, October 17, 2011

Pumpkin Papaya Soup

PP Soup

This is a soup that was inspired by having a ripening papaya at home along with pumpkins we picked at the patch. A simple hearty and tasty soup perfect for the cooler days of Autumn and halloween parties :)
It is very South Indian influenced in the spices and herbs that went into it, with a slight touch of Italian, in that I used some rosemary and sage
This is my recipe for Day 2 of Srivalli's Blogging Marathon
Pp Soup

Ingredients

1 Small pie pumpkin ( peeled & cubed)
1/2 big sized ripe papaya (decided, peeled & cubed)
2tbsp coconut powder
2tbsp coriander
2 dry red chilies (I used 2 too many)
4 cloves garlic
2 tsp olive oil
1/2 tsp rosemary crushed
2 leaves sage crushed
1/4 cup almond slivers
1/2 tsp turmeric
PPSoup

Preparation
1.Crush rosemary and safe and keep aside
2. In a frying pan, heat 1 tsp of oil
3. Add the coriander, coconut powder, chilies and garlic and fry until the coconut powder assumes a nice brown crispy color - Dry grind and keep
4. Remove from flame
5. In a separate deep (4-5 quart) pot, add the cubed pumpkin and papaya and allow them to cook adding 1 tsp of salt, turmeric, sage and rosemary
6. When they are soft and mushy, remove from flame allow to cool down
7. Grind into a fine paste in a blender
8. Return the ground up pumpkin- papaya to the pot and add the dry-ground mix into the paste and stir in nicely
9. Set flame at low flame and allow it to simmer for about 4-5 minutes stirring if your pot is not a non-stick
10. Serve HOT

PPSoup

Check out the other Bloggers in this Marathon
This is off to Vardhini of  Zesty Palette's Halloween Fiesta


Sunday, October 16, 2011

Caramelized Pear Tart


pear tartCaramelized Pear Tart

Starting my blogging marathon # 9 with Srivalli with a bang :)
Verge has got the better of me, again and this time some homegrown pears given to us by a friend was a recipe in the making – The luscious pictures in the book were calling out to me. OF the 6 or more pear recipes I decided on the tart –
Now who knew that making the pastry base was such a long and rather complicated process not to mention super highly caloric – I really had no idea! I thought it was like any other dough for breads – Mais non,mes amies, it is an overnight process!
I made it nevertheless, following his instructions to a T – But since then I have scoured the web and found far easier and less caloric ways of making pastry dough – Pardonez moi, Mr Verge, I mean no offense when I say that we have to wean ourselves away from those huge amounts of butter!
The recipe for the pear preparation resulted in exquisite, perfect tasting caramelized pears – mama mia!
Without much further ado, I present to you Mr.Verge’s Caramelized Pear Tart  - Ingredients and preparation instructions have been give verbatim from the book!

PUFF PASTRY
This is the most complicated dough to prepare(Verge) (so I, Priya a novice baker is not the only one)You cannot use a food processor. Everything must be done by hand, with care and precision. But in the end, what lightness, what crispiness-what a delight!
(Sorry I could not photograph the entire process since i was too flustered and buy getting my pastry to work)
Cpeartart

INGREDIENTS- YIELD: THREE 3-INCH TARTS
2 ½ cups sifted flour, plus extra for flouring work surface
1 teaspoon salt
1 pound butter: 
7 tablespoons for binding and the rest for the butter layer, chilled1 cup cold water


Puff pastry

Preparation

  • Bind the dough with water. 
  • In a medium bowl, combine the flour and salt. Form a hole in the middle and fill it with the cold water and 7 tablespoons of slightly softened butter, cut into pieces. 
  • Blend rapidly with your fingers. Form a ball of dough and shape it into a square. 
  • With a knife score the top with a grid pattern. Wrap in plastic wrap and refrigerate for at least 30 minutes.
  • Work the butter. 
  • On a lightly floured board, roll out the rest of the butter into a 3 x 6-inch rectangle. 
  • Add a little flour to the rolling pin as needed. Refrigerate. For everything to work well, the dough and butter must be the same temperature. 
  • Combine the dough and butter. 
  • On a floured pastry board, roll out the dough until you have a rectangle that is about 8 x 12 inches. 
  • Now place the butter rectangle in the center. Fold the edges of the dough completely over the butter, starting with the long sides and then the short sides, pressing the edges of the dough together. 
  • Roll out this package until you have a new rectangle measuring approximately 20 inches in length and 8 inches in width. 
  • Fold it into thirds, folding back and under the short edges. 
  • Turn the board a quarter turn. Roll the dough out again until you have a rectangle of the same size. Again fold into thirds. 
  • Wrap the dough in plastic wrap and refrigerate for 20 to 30 minutes.
  • Repeat the above steps twice: roll out the dough, fold into thirds, let rest. Refrigerate at least 45 minutes or overnight, if desired. Just before using the dough, repeat the steps one more time. 
  • Finish. 
  • Cut the amount you need. Roll out to the desired dimension. Wrap the leftover dough; it will keep for 2 to 3 days in the refrigerator.

Caramelized Pear Tart
This recipe will remind you of a traditional tarte tatin. Have you ever tried to make one with pears? Personally, I almost prefer the pear variation. If you want to stick to tradition, replace the pears with pippin apples and the pear brandy (which is optional) with Calvados


Ingredients

4 ripe pears
Juice of one lemon
2 tablespoons pear brandy (optional)
5 tablespoons butter
½ cup sugar
1/3 recipe puff pastry or short pastry dough
Equipment
cast-iron skillet with high sides, or any frying pan 9 ½ -10 inches in diameter with a heatproof handle.

Preparation
1.Peel the pears. Slice into 6 sections and remove the core and the stems. Sprinkle with the lemon juice and brandy.
2.Preheat the oven to 475 degrees Fahrenheit
3.Melt the butter in the skillet. Add the sugar, stirring, and remove from the heat when the mixture is smooth. Arrange the pear slices in the pan, forming a circle with their tips toward the center.
4.Transfer the pan to the oven and bake for about 20 minutes, until the pears are completely coated with the caramelized sugar.
5.In the meantime, roll out the dough into a circle equal in diameter to the pan. Prick with a fork. Once the pears are caramelized, remove the pan from the oven and cover with the dough, taking care to seal or fold along the sides. Lower the temperature to 350 degrees Fahrenheit. Bake for another 15-20 minutes, until the crust is a beautiful golden color.
6.Remove the pan from the oven. Gently heat for 1 minute on the stove. Shake gently to make sure that the fruit is not sticking to the bottom. Wearing cooking mitts, turn a plate over onto the crust; in one quick movement, flip the pan over. The caramelized fruit should now appear on top. Serve warm. 

slice

Check out the other Bloggers in this Marathon

Wednesday, October 12, 2011

Avial

avial

This is a traditional South Indian delicacy, largely influenced by Kerala cuisine, but well entrenched in Tamil Nadu as well - A festive dish Avial is made with slight differences from region to region, but for this blog hop, I got the perfect blog for the dish - Kaveri's Palakkad Chamayal - This is my post for Blog Hop Wednesday, a wonderful event started by Radhika of Tickling Palates

I have my own recipe for this as well, but I wanted to try out her method while incorporating some of my fav ingredients as well- For those who don't know Kaveri (unlikely) she has an amazing collection of authentic Kerala and Palakkad recipes which really appeal to me esp since coconut is a staple and I love using it in my preparations - Here is Kaveri's recipe

I am late posting this, but it is still wednesday :)
Serves - 6-8 people -1or 2 cups each
Ingredients:

Vegetables -  (some of the veggies she used are not available here)
1/2 - 1 cup each of snake gourd, carrots, chow chow (chayote Squash) yellow bottle gourds,
1 quart plain low fat yogurt
1-2 cups of thick buttermilk (depending on how much gravy you'd like - I am not a thick avial person so I use buttermilk to thin it down)
4-5 green chilies
1/2 cup grated coconut
1/4 tsp Turmeric
1 tsp Cumin
1/4 cup crushed cilantro
1tbsp coconut oil
Avial
Before adding yogurt
Avial
After adding yogurt
Preparation
Steam or pressure cook the veggies with a 1 cup of water and the turmeric
Wet grind the coconut, green chilies,  cumin and cilantro
Pour ground paste into a saucepan and allow it to cook for few minutes - it will thicken
Now add the cooked veggies and the salt and let the mix come to boil
Switch stove off
In a separate bowl, lightly whip the yogurt and the buttermilk and keep
When the veggies in the sauce pan cool down, add the yogurt mix and bring both gravies and yogurt nicely together.
Add 1 tbsp coconut oil at the very end before serving.
avial

Tadka or temper with curry leaves

Serve at room temp with dal rice and ghee with appalam on the side :)
NOTE: Avial almost always tastes even better the next day, so be sure to have some leftovers:)

BHWednesdays