Saturday, November 13, 2010

Baked Spaghetti Squash Pasta

We were at the grocery store last weekend and I saw fresh, yellow spaghetti squash, it seemed to be speaking to me and I said, hey - that'll be a good one for my blog since we make pasta dinners at least once a week. It waited patiently in my fridge until last night when I decided the time had come to send him to his rightful place  - our stomach :-) It is a light, satisfying and healthy - An all in one dish = no need for sides
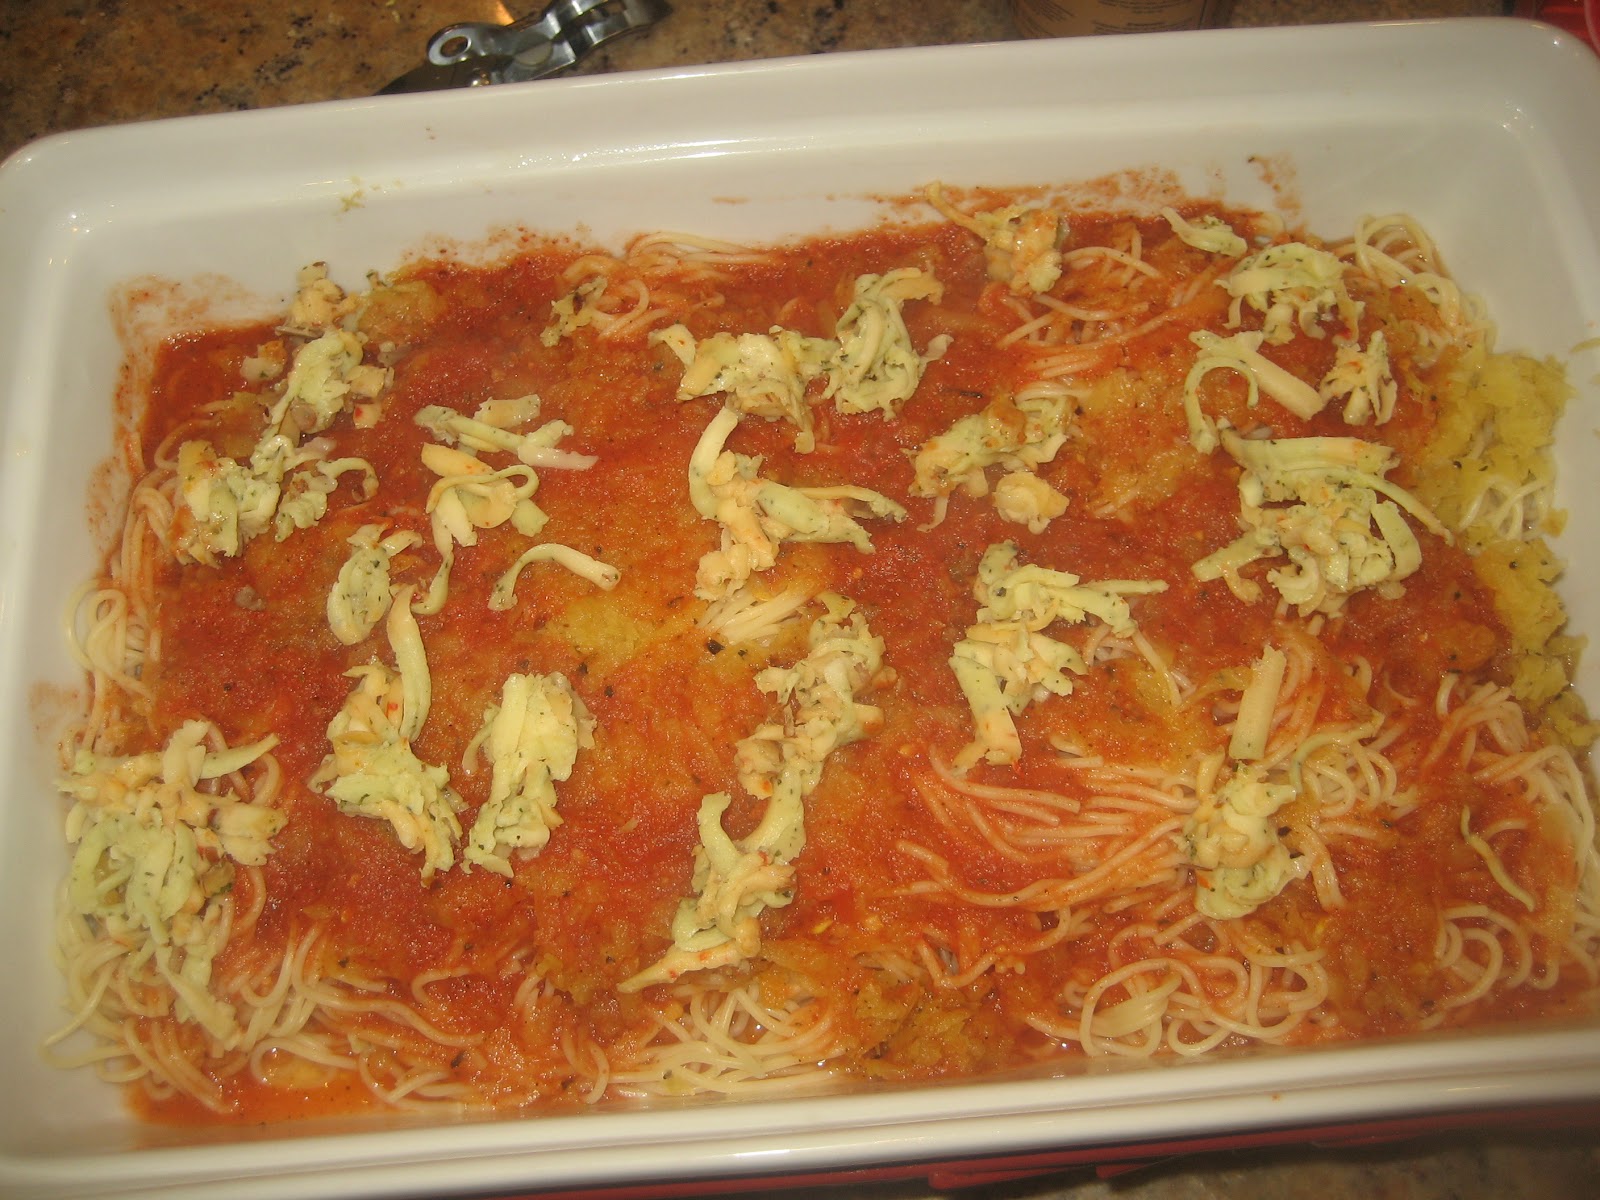
For those who want to know what a spaghetti squash looks like, see the picture below. It's inside is shallow and seedy.


Ingredients:

1 spaghetti squash . 
1 box of Angel hair pasta
1 can of diced tomatoes
Herbs: 1/2 teaspoon each of dried rosemary, oregano and basil, dried garlic leaves, 
Spices:
1 teaspoon of whole black pepper
2 Cayenne peppers (or red chillies as they are commonly called)

Preparation:
In a 5 quart pot, fill half way up with water and boil. Add a drop of olive oil and a pinch of salt and add the angel hair pasta and let cook covered - it should be al dente in about 5 minutes on high heat.

In the meantime, peel and deseed squash. Then cut into 4 strips and grate with the bigger teeth of the grater.


Remove the pasta, pour into colander; run cold water through it and let it drain


Set a non-stick frying pan. Add 1 teaspoon of olive oil and some of the condiments mentioned and some peppers. Let it cook and golden. Then turn off

Dry grind your peppers

Open your diced tomato can, and empty its contents into a blender. Add the peppers and the same herbs to the puree and blend one more time


In the now empty pasta pot, pour the pureed tomato sauce and let it cook well - add salt to taste.

Preparing your baking pan and oven
Preheat oven to 350
Lightly grease your baking pan with olive oil
First spread one layer of the pasta
Then add a layer of squash
Top it with half the sauce
Sprinkle grated cheddar and/or mozarella cheeses (a small amount)
repeat process to get a second layer 
Top the pan with a sprinkle of Parmesan cheese

Layering pics

First the pasta


Then the squash
                                                     Next the sauce
                                     
                                                       Topped with the cheese
                                                         Sprinkle the Parmesan last
Cook for about 30 minutes Serve HOT :-)


                                                                    Finished product

                                                            On you plate - benne Apettito


Tuesday, November 9, 2010

Gulab Jamun

For this recipe I must thank my friend Gayathri. We have been to functions at a common friend's house and Gayathri always brought her Gulabs - My son esp, declared them "THE BEST" he'd ever tasted - Haldiram ji - go fly a kite! So this recipe had to make it on my blog.  Went exactly per her directions and they turned out really good - This was another challenge - Know now why I stayed away from making sweets - but with the right recipe, it seems like huge achievement - so I say YAY!
This is a from the scratch recipe - So please follow all steps correctly

Ingredients
For the Jamun:

1 cup of Maida (I used all purpose flour)
1 ½ cup of carnation milk powder
¼ teaspoon of baking soda
Low fat / regular heavy cream ( I used regular)

For the Syrup
3 cups of sugar
3 cups of water
¼ teaspoon kesar powder
½ teaspoon of ground cardamom
Crsico vegetable oil to fry (a first for me)


Preparing the Jamuns

Sift the maida and the milk powder and the baking soda - The milk powder can be knotty - break them down as much as possible and discard the rest
Put mixture in a food processor/ blender and knead slowly adding the heavy cream until you get pizza dough/ chappati atta consistency

Keep closed for 45 minutes

Make large marble sized balls (see picture below) and keep ready
Get the oil going in a shallow pan - not out regular deep frying pan! Pour just enough oil you think will cover the jamun balls.
Next, mix the water and sugar and let it boil until it starts getting slightly sticky - On a gas stove, this takes about 4-5 minutes only -
Start frying the jamuns - if they have been rolled to perfect rounds, chances are they will favor one side and not want to be turned around - which is when you have to gently turn and hold them down so both sides get cooked. When they are a dark golden brown (see pic below) remove, drain and drop hot into the syrup all it to soak.
Secret tip for the syrup:
Take a little before the required consistency because as it cools it tends to thicken
Secret Tip for the Jamun:
Keep the heat at medium-low so it will allow the jamuns to cook from the inside to the outside - Or else the outside will brown while the inside remains uncooked.
Keep a paper-toweled colander to drop the fried jamuns into for a minute to drain the excess oil before dropping them into the syrup.

Happy Jamuning :-)


Monday, November 8, 2010

Baked Shoestring Sweet Potato

Guilt free fries
 You cannot ask for a simpler recipe than this one- seriously!
Except the cutting part - But that's what sweet husbands are for, right ?

Ingredients
shoe string cut sweet potatoes about 5 or 6 small sized ones
curry powder
olive oil

Preparation
Set oven to 425 degrees
In a mixing bowl mix the sweet potatoes with curry powder and dribble olive oil sparingly over it
Spread in a single layer on a flat baking pan
cook for about 10 minutes
Remove from over, turn them around with a spatula
Put back in the over and let the other side cook for another 10 minutes

Serve hot with ketchup :-)

Variation Two: For those who cannot find curry powder, you can substitute with crushed pepper and maybe some finely ground coriander seeds.

Mysore Pak

This was one of my biggest challenges, but the end result, I'm told, is well worth the effort
Another traditional Venkatam Deepavali item (to my sister-in-law, Alli, this is a pidicha item :-)))
Get ready to give those arms a good exercise :-)

Ingredients
2 cup of besan/kadalamavu/gram flour
2 cups of sugar
2 cups slightly warm ghee
1/2 a cup of water

Preparation:
Get a short-rimmed pan greased and ready
Sift the flour to remove all knots
pour the ghee slowly and mix in to the flour to make a flowing paste 
In a heavy bottomed pan, mix the sugar and water and heat on medium high flame. 
When the sugar has dissolved in the water and is is starting to boil, pour in the batter slowly, stirring continuously- This is where the arms get their exercise :-)
So keep stirring until the pahu comes off the sides without sticking.... this takes a while, so be patient and put the arms to work, the better to enjoy the end result 
You will see the thickening -
NOTE:  If the bottom starts browning, then you have kept it on the flame for too long
Remove and pour on to the greased pan 
In a minute, while it is still hot, start cutting into the desired squares/ diamond shapes
Let it remain on the pan for until it cools
Then remove the slices and arrange on a plate
Happy Mysore -Paaking :-)


Ribbon Poondu karachev

Poondu Karachev for Deepavali is a family tradition which I never want to give up, considering how well-loved it is - Never fails to hit the home run :-) I just used a different disc, for a change.

Here is my recipe from taste buds/brain recollection of my mom's incredible karachev

Ingredients
2:1 proportion of gram flour and rice flour (Kadalamavu/Besan: Rice flour)
1 whole pod of garlic
10-12 dried red chillies (this is adjustable according to your taste)
1 tablespoon of  warm ghee
Approx 1 to 1-1/2 cups of water
Murruku press with 2 slit disc to get the ribbon shape
Oil to fry

Preparation

Sift the flours so that they are fine and knot free
Add the salt to the dry flours and mix well
Add the wamed ghee and knead in
Grind into fine flowing paste the garlic and red chillies with 1 cup of water
Slowly add the garlic paste and mix in simultaneously into the mix until you get s smooth batter - (see picture below for texture and consistency)

Prepare the press
Grease the press on the inside container of the press and and the outside of the presser that you push down. Take a rounded lump of the batter and drop it into the press, put the presser on top and keep ready

Set up for frying
Fill 2/3 of a deep pan with sunflower or corn oil
Allow it to heat up in medium high heat
Drop a small piece of the batter in to test if the oil is ready - the piece should pop up with a bubbling sizzle around it
Now press the batter moving your wrist around the oil to make circular nest like pattern
Turn it over gingerly
Wait for it to turn light golden brown
Remove from heat and place in a paper-toweled colander to let the water drain

Break them up as they get cooler and store in a seal tight container


Wednesday, November 3, 2010

Pepper Karachev (Milagu Karachev) Deepavali Special

Celebrating Deepavali so far from home is no fun. But we got to make the best of the situation and I want to give my kiddos a small fraction of the fun and enjoyment of this most celebrated festival. So I say to myself, quite whining about stuff and get your act together. My mind went over the sweet and savory treats my mom used to make and I launched on the first of the 3 treats I've plan for this Deepavali and that be - pepper Karachev. I tried to get the flavor of the karachev the even my 2 yr-old so adores from Grand Sweets and Snacks -
Making it by myself somehow feels more satisfying than just buying from the store - there's my silver lining :-)

Very simple recipe

Ingredients:

2 cups of gram flour or kadalmavu
1 cup of rice flour
15-20 kernels of pepper
2 red chillies
5 table spoons of melted butter
oil to fry
1 cup of water

NOTE: you will need a Karachev Press
Preparation

Sift both the flours in a sieve.
Coarsely grind the pepper and add to the dry flour and mix in
Finely grind the red chillies and do the same
Add the desired amount of salt
Melt the butter and slowly to the flour, kneading it in as you go
Add one cup of warm water, slowly kneading as you did with the butter - the consistency is creamy smooth - be careful not make it too watery.

Frying:

Fill a frying pan 2/3 with oil.
Wait for it to get good and hot
Butter both parts of the press and drop a handful of the batter in it and squeeze in oil, rotating arms in making spaghetti nest like formation - picture will explain this better!
Wait until it turns golden brown remove and place in a paper-towel lined container.
break it up after it cools down